Welcome Message Templates
Contents
Welcome Email template
This Message template can be used to send welcome messages to new users.
You can use these standard variables in any field of the Welcome Email template:
- $user_name: The new user's username.
- $email: The new user's email address.
- $first_name: The new user's first name.
- $last_name: The new user's last name.
- $password_reset_link: A link to start the Password Recovery process.
- $change_password_link: A unique link for this user to immediately change their password.
- $recovery_email: The new user's recovery email address.
- $recovery_phone: The new user's recovery phone number.
Complete the following fields for the new template:
- Template Name: A short description of the email (this will display in the Message Templates List)
- Subject: Subject line for the email
- Message: Text of the email, written in html
- From Address: The sending email address, the domain must be allowed in sendgrid
- To: Email address(es) to receive the email. Separate multiple addresses with commas. Using $email in To field will send email to intended users.
- CC: Optional email address(es) to individuals or teams who should be notified of the new user's addition to Cloudwork, for example the support person at the school or the parent for a new student account. Separate multiple addresses with commas.
Click Submit to create the new template.
Notes
- The To field should be filled with $email, rather than someone's actual email.
- If someone's actual email is used in the To field, every time you try to send a welcome message it will go the email address in the To field rather than to intended user.
- The To field will only send the Welcome Message to the email address(es) in that field. No other email address will receive the email.
- If multiple email addresses are entered into the To field, when the email is sent through, the only email address the recipient will see is their own email address.
- The To field can customise the layout of the email clients To field. By having
$first_name $last_name <$email>
in the Welcome Message To field, when the Welcome Message is sent, the email client will display the email was sent totest example <example@email.com>
- The email address in the To field, should be an existing one to ensure the user will receive and see the message, often a personal email address.
- You can also use any extra attributes your users might have, such as $salutation. Please note that a formatting option that does not match the above list or a user's custom attributes will be left in your email unchanged
This is an example of the form for writing a Welcome Email template.

Sending of Welcome Messages
Welcome Messages can either be sent Automatically or Manually.
Manually
Sending a Welcome Message to a user individually
- A Welcome Email can be initiated from the User's detail screen.

1. Select Users from the Cloudwork dashboard menu, then select the user from the Users List to display their details.
2. Click the Send Welcome Message button near the top of the screen.
3. Select the Welcome Message template you want, then click Submit to initiate the send.
Bulk Send Welcome Message
- After creating a Welcome Message Template, you will be brought back to Message Template List.
- Click on the Welcome Message Template you just created.
- Click Send
- From here you can filter out users based on rules you create.
- Select should the filter include Suspended users with the checkbox labelled Include Suspended Users
- Once you have created your filter click continue
- The next page will display the users that match your filter, these users will be sent the Welcome Message. If these users are not the expected users click cancel to return to the filtering process.
- If the users shown are the intended users for receiving the Welcome Message, and you wish that further welcome messages not be sent to the users tick the checkbox labelled Mark user as having Welcome Message already been sent
- Click Continue to send the Welcome Message.
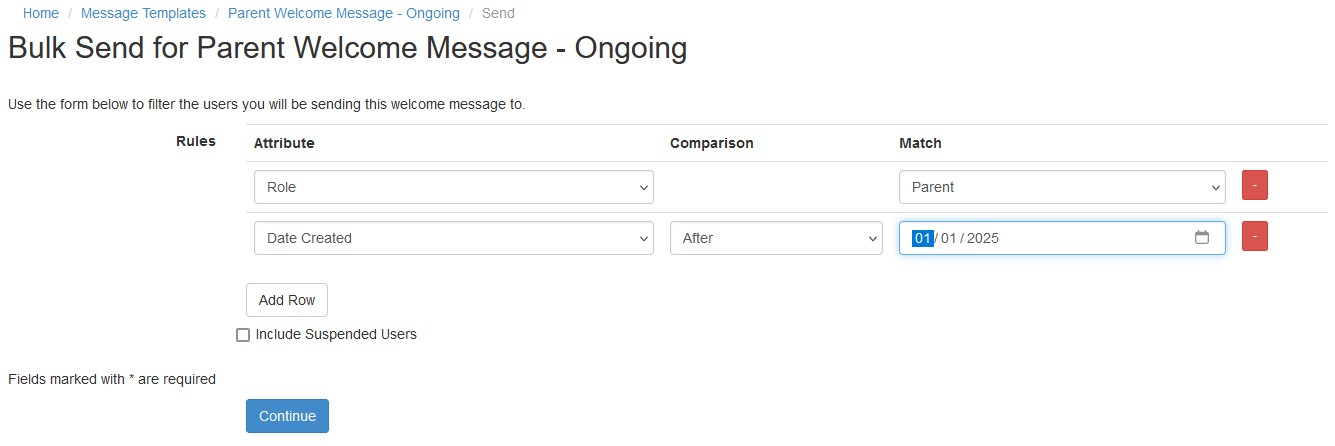
Example Filtered Bulk Send
In this example we will aim to send a bulk message out to all parents whose account was created after a certain date, say January 1, 2025. To do this we follow this process:
- Choose the appropriate message template you wish to send or create a new one
- Choose the "Send" action for this template
- We now need to choose the recipients of this send. We do this by defining filters to apply. In this case we have two filters:
- Only parent accounts, so select the Attribute "Role" and Match the value "Parent"
- Only accounts created after 1/1/2025, so click the "Add Row" button to create the additional filter and then choose the Attribute "Date Created" using the comparison "After" and finally the Match value of "01/01/2025"(Note: You can use the calendar select dialog to enter this value)
- Your filter should now appear like this:

Automatically
Automatic Welcome Messages
- A Welcome Email can be initiated from a sync profile run. When you tick the Send Welcome Message box under Advanced Settings this will send every new user that is added with the sync profile a welcome message.

Important: Adding new users to Cloudwork may involve more than one synchronisation. For example, a user may be added during an Active Directory synchronisation and then additional information about the user comes from a different sync run. If you want to initiate Welcome Emails from a sync run, ensure that it is the later sync run that initiates the emails so that all user details required to populate the email are in Cloudwork.
1. Select Sync Profiles from the Cloudwork dashboard menu, then select the profile from the Sync Profile List.
2. In Advanced Settings there are two fields: Send Welcome Messages and Welcome Message Template. Edit these as needed to specify initiation of a welcome email when a sync run adds new users.

Studentnet is working to develop additional options for automating Welcome Emails to users. If you wish to contact Studentnet to discuss your requirements, contact support@studentnet.net
Example Welcome Message Templates
Here are some pre-made HTML templates for any message template, these templates can be used when sending welcome messages to new users.
Below are example Welcome Message Templates
Basic Templates
The Basic Template is for people who have little to no HTML experience and leaves room for much more customisation.
<p><img style="display: block; margin-left: auto; margin-right: auto;" src="Add Image Here" /> Banner for your school </p>
<h1> Welcome to Example School </h1>
<p> Dear $first_name,
<p> Here is the example page <p>

<h2>Instructions</h2>

<p>Your username will be your email address, which is: </p>
<p style="text-align:center">$email</p>
<p>Follow the link below to automatically set a password:</p>
<p>$change_password_link</p>

<p>Once you have set your password you can login here: (link)<p>

<p><img style="display: block; margin-left: auto; margin-right: auto;" src="Add Image Here" />Footer</p>
Advanced Templates
The Advanced Template is for people who have some HTML experience or someone wanting something that is a bit more pre-customised, there is still room for more customisation
<!doctype html>
<html>
  <head>
    <meta name="viewport" content="width=device-width">
    <meta http-equiv="Content-Type" content="text/html; charset=UTF-8">
    <title>{% block head_title %}Alert{% endblock %}</title>
    <style>
    /* -------------------------------------
        INLINED WITH htmlemail.io/inline
    ------------------------------------- */
    /* -------------------------------------
        RESPONSIVE AND MOBILE FRIENDLY STYLES
    ------------------------------------- */
    @media only screen and (max-width: 620px) {
      table[class=body] h1 {
        font-size: 28px !important;
        margin-bottom: 10px !important;
      }
      table[class=body] p,
            table[class=body] ul,
            table[class=body] ol,
            table[class=body] td,
            table[class=body] span,
            table[class=body] a {
        font-size: 16px !important;
      }
      table[class=body] .wrapper,
            table[class=body] .article {
        padding: 10px !important;
      }
      table[class=body] .content {
        padding: 0 !important;
      }
      table[class=body] .container {
        padding: 0 !important;
        width: 100% !important;
      }
      table[class=body] .main {
        border-left-width: 0 !important;
        border-radius: 0 !important;
        border-right-width: 0 !important;
      }
      table[class=body] .btn table {
        width: 100% !important;
      }
      table[class=body] .btn a {
        width: 100% !important;
      }
      table[class=body] .img-responsive {
        height: auto !important;
        max-width: 100% !important;
        width: auto !important;
      }
    }

    /* -------------------------------------
        PRESERVE THESE STYLES IN THE HEAD
    ------------------------------------- */
    @media all {
      .ExternalClass {
        width: 100%;
      }
      .ExternalClass,
            .ExternalClass p,
            .ExternalClass span,
            .ExternalClass font,
            .ExternalClass td,
            .ExternalClass div {
        line-height: 100%;
      }
      .apple-link a {
        color: inherit !important;
        font-family: inherit !important;
        font-size: inherit !important;
        font-weight: inherit !important;
        line-height: inherit !important;
        text-decoration: none !important;
      }
      #MessageViewBody a {
        color: inherit;
        text-decoration: none;
        font-size: inherit;
        font-family: inherit;
        font-weight: inherit;
        line-height: inherit;
      }
      .btn-primary table td:hover {
        background-color: #34495e !important;
      }
      .btn-primary a:hover {
        background-color: #34495e !important;
        border-color: #34495e !important;
      }
    }
    </style>
  </head>
  <body class="" style="background-color: #f6f6f6; font-family: sans-serif; -webkit-font-smoothing: antialiased; font-size: 14px; line-height: 1.4; margin: 0; padding: 0; -ms-text-size-adjust: 100%; -webkit-text-size-adjust: 100%;">
    <table border="0" cellpadding="0" cellspacing="0" class="body" style="border-collapse: separate; mso-table-lspace: 0pt; mso-table-rspace: 0pt; width: 100%; background-color: #f6f6f6;">
      <tr>
        <td style="font-family: sans-serif; font-size: 14px; vertical-align: top;"> </td>
        <td class="container" style="font-family: sans-serif; font-size: 14px; vertical-align: top; display: block; Margin: 0 auto; max-width: 580px; padding: 10px; width: 580px;">
          <div class="content" style="box-sizing: border-box; display: block; Margin: 0 auto; max-width: 580px; padding: 10px;">

            <!-- START CENTERED WHITE CONTAINER -->
            <span class="preheader" style="color: transparent; display: none; height: 0; max-height: 0; max-width: 0; opacity: 0; overflow: hidden; mso-hide: all; visibility: hidden; width: 0;">Your Welcome Message</span>
            <table class="main" style="border-collapse: separate; mso-table-lspace: 0pt; mso-table-rspace: 0pt; width: 100%; background: #ffffff; border-radius: 3px;">

              <!-- START MAIN CONTENT AREA -->
              <tr>
                <td class="wrapper" style="font-family: sans-serif; font-size: 14px; vertical-align: top; box-sizing: border-box; padding: 20px;">
                  <table border="0" cellpadding="0" cellspacing="0" style="border-collapse: separate; mso-table-lspace: 0pt; mso-table-rspace: 0pt; width: 100%;">
                    <tr>
                      <td style="font-family: sans-serif; font-size: 14px; vertical-align: top;">
                        <p style="font-family: sans-serif; font-size: 14px; font-weight: normal; margin: 0; Margin-bottom: 15px;">Hi $first_name,</p>
                        <p style="font-family: sans-serif; font-size: 14px; font-weight: normal; margin: 0; Margin-bottom: 15px;">Welcome to the Example School! A brand new account has been created for you, and you can find your details below:</p>

                        <p style="font-family: sans-serif; font-size: 14px; font-weight: normal; margin: 0; Margin-bottom: 15px;">Username: $user_name</p>
                        <p style="font-family: sans-serif; font-size: 14px; font-weight: normal; margin: 0; Margin-bottom: 15px;">Your Full Name: $first_name $last_name</p>
                        <p style="font-family: sans-serif; font-size: 14px; font-weight: normal; margin: 0; Margin-bottom: 15px;">Once you've set a password, you can manage your account and access other services at <a href>Link</a></p>
                        <p style="font-family: sans-serif; font-size: 14px; font-weight: normal; margin: 0; Margin-bottom: 15px;">Click on the button below to set your password and get started.</p>
                        <table border="0" cellpadding="0" cellspacing="0" class="btn btn-primary" style="border-collapse: separate; mso-table-lspace: 0pt; mso-table-rspace: 0pt; width: 100%; box-sizing: border-box;">
                          <tbody>
                            <tr>
                              <td align="left" style="font-family: sans-serif; font-size: 14px; vertical-align: top; padding-bottom: 15px;">
                                <table border="0" cellpadding="0" cellspacing="0" style="border-collapse: separate; mso-table-lspace: 0pt; mso-table-rspace: 0pt; width: auto;">
                                  <tbody>
                                    <tr>
                                    <!-- Add Change Password Link at $change_password_link -->
                                      <td style="font-family: sans-serif; font-size: 14px; vertical-align: top; background-color: #3498db; border-radius: 5px; text-align: center;"> <a href="$change_password_link" target="_blank" style="display: inline-block; color: #ffffff; background-color: #3498db; border: solid 1px #3498db; border-radius: 5px; box-sizing: border-box; cursor: pointer; text-decoration: none; font-size: 14px; font-weight: bold; margin: 0; padding: 12px 25px; text-transform: capitalize; border-color: #3498db;">Get Started</a> </td>
                                    </tr>
                                  </tbody>
                                </table>
                              </td>
                            </tr>
                          </tbody>
                        </table>
                        <p style="font-family: sans-serif; font-size: 14px; font-weight: normal; margin: 0; Margin-bottom: 15px;">Regards,</p>
                        <p style="font-family: sans-serif; font-size: 14px; font-weight: normal; margin: 0; Margin-bottom: 15px;">Your Name Here</p>
                      </td>
                    </tr>
                  </table>
                </td>
              </tr>

            <!-- END MAIN CONTENT AREA -->
            </table>

            <!-- START FOOTER -->
            <div class="footer" style="clear: both; Margin-top: 10px; text-align: center; width: 100%;">
              <table border="0" cellpadding="0" cellspacing="0" style="border-collapse: separate; mso-table-lspace: 0pt; mso-table-rspace: 0pt; width: 100%;">
                <tr>
                  <td class="content-block" style="font-family: sans-serif; vertical-align: top; padding-bottom: 10px; padding-top: 10px; font-size: 12px; color: #999999; text-align: center;">
                    <span class="apple-link" style="color: #999999; font-size: 12px; text-align: center;">Example School</span>
                  </td>
                </tr>
              </table>
            </div>
            <!-- END FOOTER -->

          <!-- END CENTERED WHITE CONTAINER -->
          </div>
        </td>
        <td style="font-family: sans-serif; font-size: 14px; vertical-align: top;"> </td>
      </tr>
    </table>
  </body>
</html>
FAQ
| Question | Answer |
|---|---|
| Why are Welcome Messages not being sent |
|