Difference between revisions of "Jamf Pro"
Jump to navigation
Jump to search
| (11 intermediate revisions by the same user not shown) | |||
| Line 1: | Line 1: | ||
| + | =Jamf Pro= | ||
| + | |||
==Single Sign On with Cloudwork== | ==Single Sign On with Cloudwork== | ||
#Login to '''Cloudwork dashboard''' | #Login to '''Cloudwork dashboard''' | ||
#Navigate to '''Single Sign On'''>'''Add New Service'''>'''Custom SAML Service''' | #Navigate to '''Single Sign On'''>'''Add New Service'''>'''Custom SAML Service''' | ||
#Fill out the form: | #Fill out the form: | ||
| − | #:'''Name''' = ''' | + | #:'''Name''' = '''Jamf Pro''' |
#:'''Entity ID''': | #:'''Entity ID''': | ||
| − | #:* If using | + | #:* If using Jamf OnPremise, use for Entity ID: https://<Jamf Pro domain>:8443/saml/metadata |
| − | #:* If using Jamfcloud hosted server, use for Entity ID: https://< | + | #:* If using Jamfcloud hosted server, use for Entity ID: https://<Jamf Pro URL>/saml/metadata |
#:'''ACS''': | #:'''ACS''': | ||
| − | #:* If using | + | #:* If using Jamf OnPremise, use for ACS: https://<Jamf Pro domain>:8443/saml/SSO |
| − | #:* If using Jamfcloud hosted server, use for ACS: https://< | + | #:* If using Jamfcloud hosted server, use for ACS: https://<Jamf Pro URL>/saml/SSO |
#:'''Single Logout Service''' = Leave blank | #:'''Single Logout Service''' = Leave blank | ||
#:'''NameID Value''' = From the drop down select '''Email''' | #:'''NameID Value''' = From the drop down select '''Email''' | ||
#:'''NameID Format''' = select from drop down '''urn:oasis:names:tc:SAML:1.1:nameid-format:emailAddress''' | #:'''NameID Format''' = select from drop down '''urn:oasis:names:tc:SAML:1.1:nameid-format:emailAddress''' | ||
#:'''Login URL''': | #:'''Login URL''': | ||
| − | #:* If using | + | #:* If using Jamf OnPremise, use for Login URL: https://<Jamf Pro domain>:8443 |
| − | #:* If using Jamfcloud hosted server, use for Login URL: https://< | + | #:* If using Jamfcloud hosted server, use for Login URL: https://<Jamf Pro URL> |
#Click '''Submit''' | #Click '''Submit''' | ||
#Under '''XML File''' click download and save file as '''.XML''' file | #Under '''XML File''' click download and save file as '''.XML''' file | ||
| − | ==Single Sign On with | + | [[File:JAMFPro_Cloudwork_Form.PNG|150px|centre|frame|Example of Cloudwork Setup]] |
| − | #Login to your | + | |
| + | ==Single Sign On with Jamf Pro== | ||
| + | #Login to your Jamf Pro dashboard | ||
#In the top right corner click the gear | #In the top right corner click the gear | ||
#Under '''System Settings''' click on '''Single Sign On''' | #Under '''System Settings''' click on '''Single Sign On''' | ||
| Line 28: | Line 32: | ||
#:'''Other Provider''' = Enter in '''Cloudwork''' | #:'''Other Provider''' = Enter in '''Cloudwork''' | ||
#:'''Entity ID''': | #:'''Entity ID''': | ||
| − | #:* If using | + | #:* If using Jamf OnPremise, use for Entity ID: https://<Jamf Pro domain>:8443/saml/metadata |
| − | #:* If using Jamfcloud hosted server, use for Entity ID: https://< | + | #:* If using Jamfcloud hosted server, use for Entity ID: https://<Jamf Pro URL>/saml/metadata |
#:'''Identity Provider Metadata Source''' = select '''Metadata File''' | #:'''Identity Provider Metadata Source''' = select '''Metadata File''' | ||
#:'''Upload Metadata File''' = Upload the XML File which was downloaded from Cloudwork Dashboard. | #:'''Upload Metadata File''' = Upload the XML File which was downloaded from Cloudwork Dashboard. | ||
| Line 36: | Line 40: | ||
#:'''Jamf Pro User Mapping''' = Set to '''Email''' | #:'''Jamf Pro User Mapping''' = Set to '''Email''' | ||
#:'''Identity Provider Group Attribute Name''' = Set to '''https://scopes.cloudwork.id/profile''' | #:'''Identity Provider Group Attribute Name''' = Set to '''https://scopes.cloudwork.id/profile''' | ||
| + | #:'''RDN Key For LDAP Group''' = Leave blank | ||
#:'''Options''': Select the following options | #:'''Options''': Select the following options | ||
#:* '''Single Sign-On Options for Jamf Pro''' | #:* '''Single Sign-On Options for Jamf Pro''' | ||
| Line 43: | Line 48: | ||
#:* '''Enrollment Access''' = Set to '''Any Identity provider user''' | #:* '''Enrollment Access''' = Set to '''Any Identity provider user''' | ||
#Click '''Save''' | #Click '''Save''' | ||
| + | [[File:JAMFPro_form_1.PNG|150px|centre|frame|Example of Jamf Pro Setup part 1]] | ||
| + | [[File:JAMFPro_form_2.PNG|150px|centre|frame|Example of Jamf Pro Setup part 2]] | ||
| − | ==Testing== | + | ==Testing Single Sign On== |
| − | #Login to your | + | #Login to your '''Jamf Pro Dashboard''' |
#In the top right corner click the gear | #In the top right corner click the gear | ||
#Click '''Jamf Pro User Accounts & Groups''' | #Click '''Jamf Pro User Accounts & Groups''' | ||
| Line 51: | Line 58: | ||
#For '''Choose Action''' select '''Create standard Account''' and click '''Next''' | #For '''Choose Action''' select '''Create standard Account''' and click '''Next''' | ||
#Populate your test user details: | #Populate your test user details: | ||
| − | #:Notes: | + | #:Notes for populating test user: |
#:*Ensure Username is full email address, and email address field is populated. | #:*Ensure Username is full email address, and email address field is populated. | ||
#:*Password entered here will be ignored | #:*Password entered here will be ignored | ||
#:Test SSO by opening a private browsing session and log into your Jamf Pro Server: | #:Test SSO by opening a private browsing session and log into your Jamf Pro Server: | ||
| − | #:*If using | + | #:*If using Jamf OnPremise, login to: '''https://<Jamf Pro domain>:8443/saml/metadata''' |
| − | #:*If using Jamfcloud hosted server, login to: '''https://< | + | #:*If using Jamfcloud hosted server, login to: '''https://<Jamf Pro URL>/saml/metadata''' |
| + | |||
| + | [[Category:Single Sign On Services]] | ||
Latest revision as of 03:14, 29 August 2022
Contents
Jamf Pro
Single Sign On with Cloudwork
- Login to Cloudwork dashboard
- Navigate to Single Sign On>Add New Service>Custom SAML Service
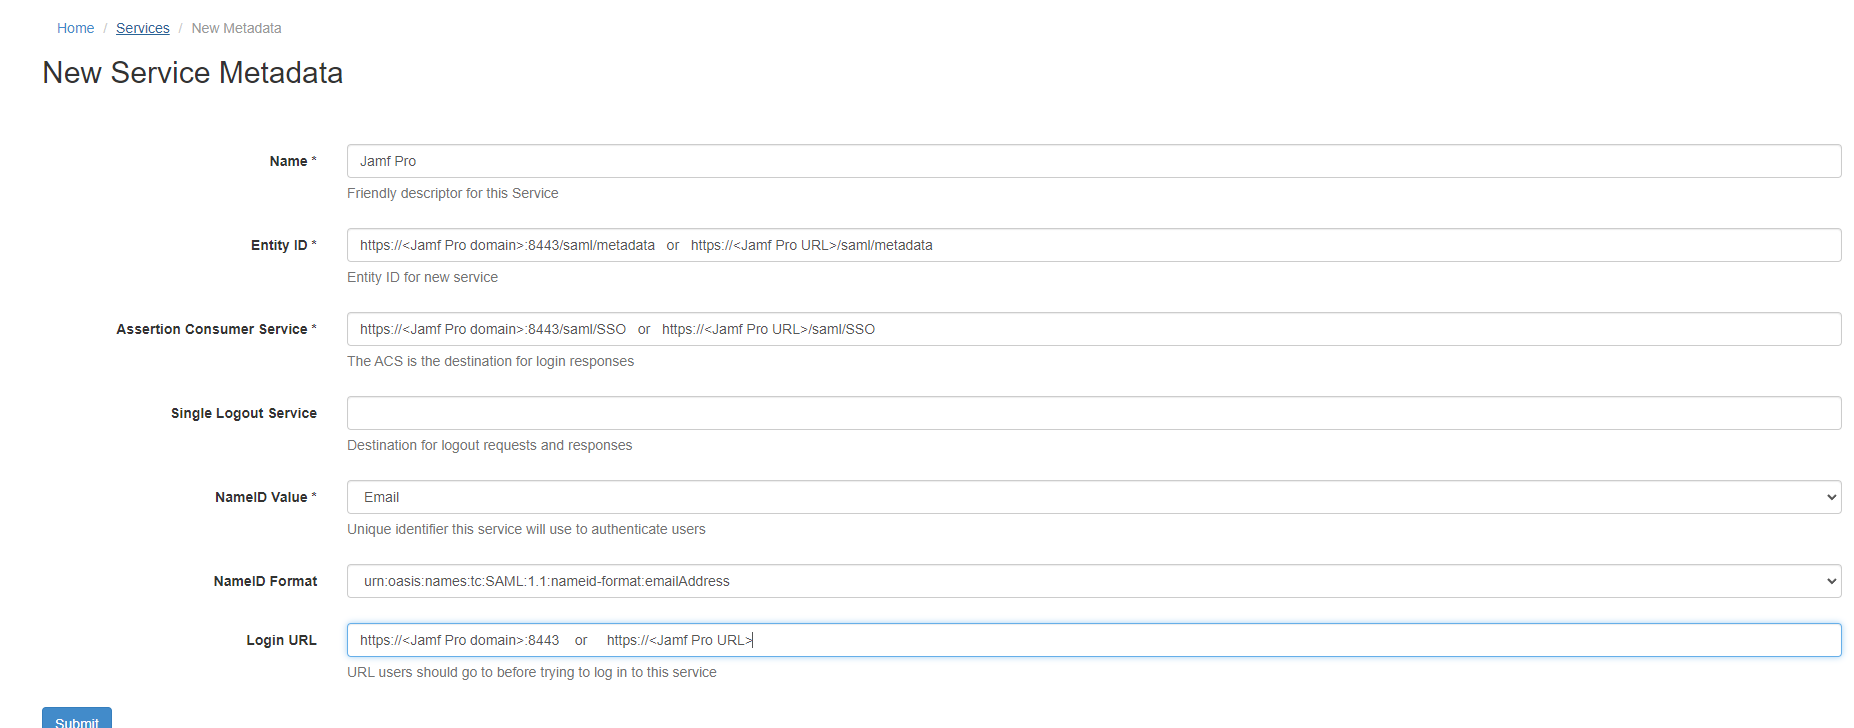
- Fill out the form:
- Name = Jamf Pro
- Entity ID:
- If using Jamf OnPremise, use for Entity ID: https://<Jamf Pro domain>:8443/saml/metadata
- If using Jamfcloud hosted server, use for Entity ID: https://<Jamf Pro URL>/saml/metadata
- ACS:
- If using Jamf OnPremise, use for ACS: https://<Jamf Pro domain>:8443/saml/SSO
- If using Jamfcloud hosted server, use for ACS: https://<Jamf Pro URL>/saml/SSO
- Single Logout Service = Leave blank
- NameID Value = From the drop down select Email
- NameID Format = select from drop down urn:oasis:names:tc:SAML:1.1:nameid-format:emailAddress
- Login URL:
- If using Jamf OnPremise, use for Login URL: https://<Jamf Pro domain>:8443
- If using Jamfcloud hosted server, use for Login URL: https://<Jamf Pro URL>
- Click Submit
- Under XML File click download and save file as .XML file

Example of Cloudwork Setup
Single Sign On with Jamf Pro
- Login to your Jamf Pro dashboard
- In the top right corner click the gear
- Under System Settings click on Single Sign On
- In the bottom left corner click Edit and turn on Single Sign-On Authentication
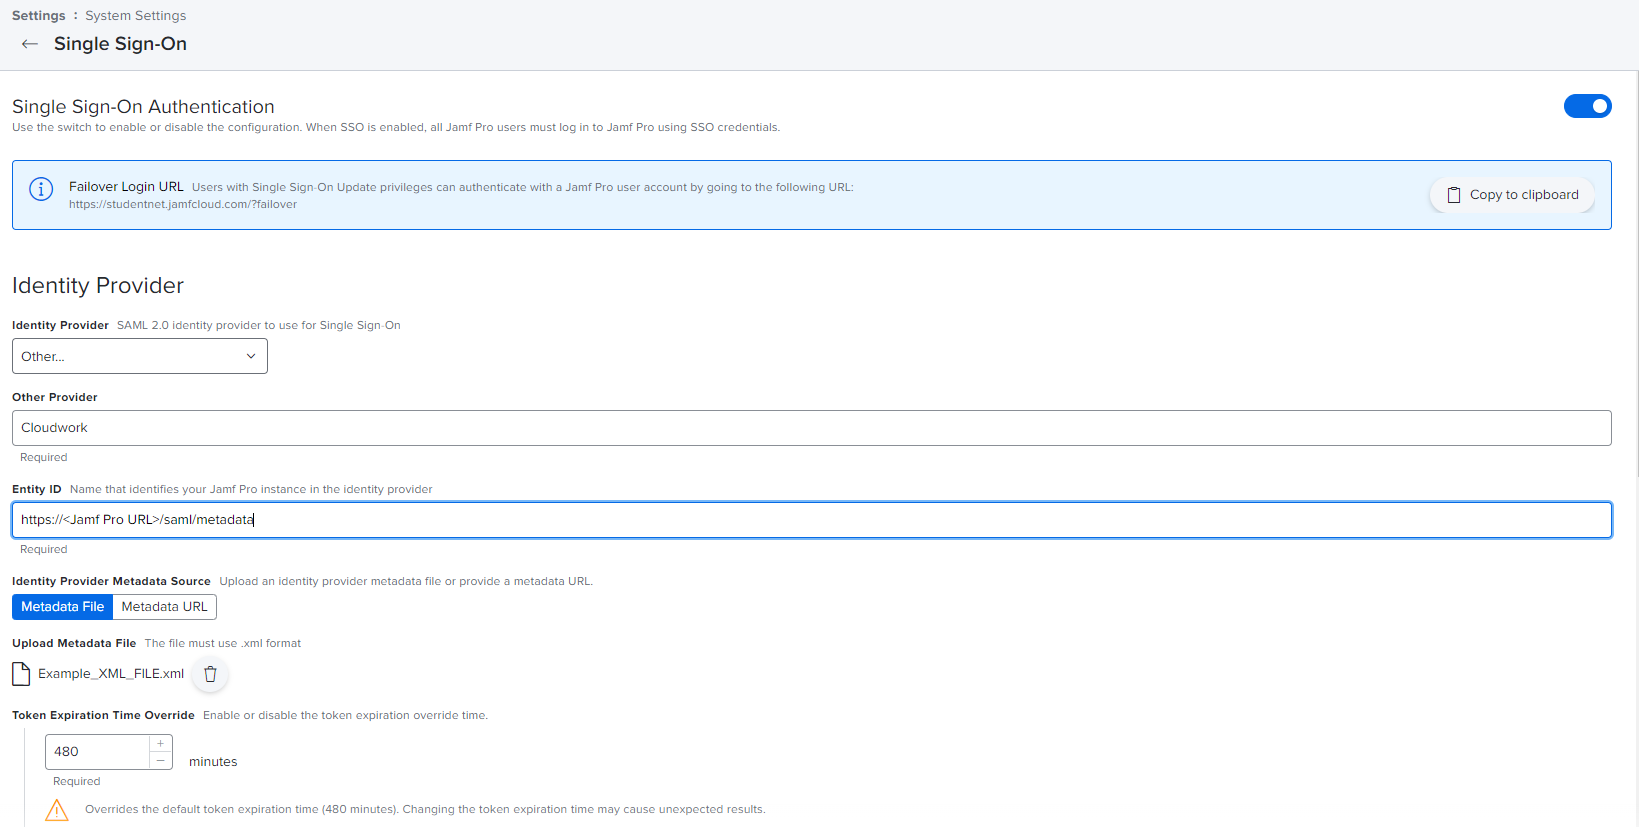
- Fill out the form:
- Identity Provider = Other
- Other Provider = Enter in Cloudwork
- Entity ID:
- If using Jamf OnPremise, use for Entity ID: https://<Jamf Pro domain>:8443/saml/metadata
- If using Jamfcloud hosted server, use for Entity ID: https://<Jamf Pro URL>/saml/metadata
- Identity Provider Metadata Source = select Metadata File
- Upload Metadata File = Upload the XML File which was downloaded from Cloudwork Dashboard.
- Token Expiration Time Override = Leave at 480
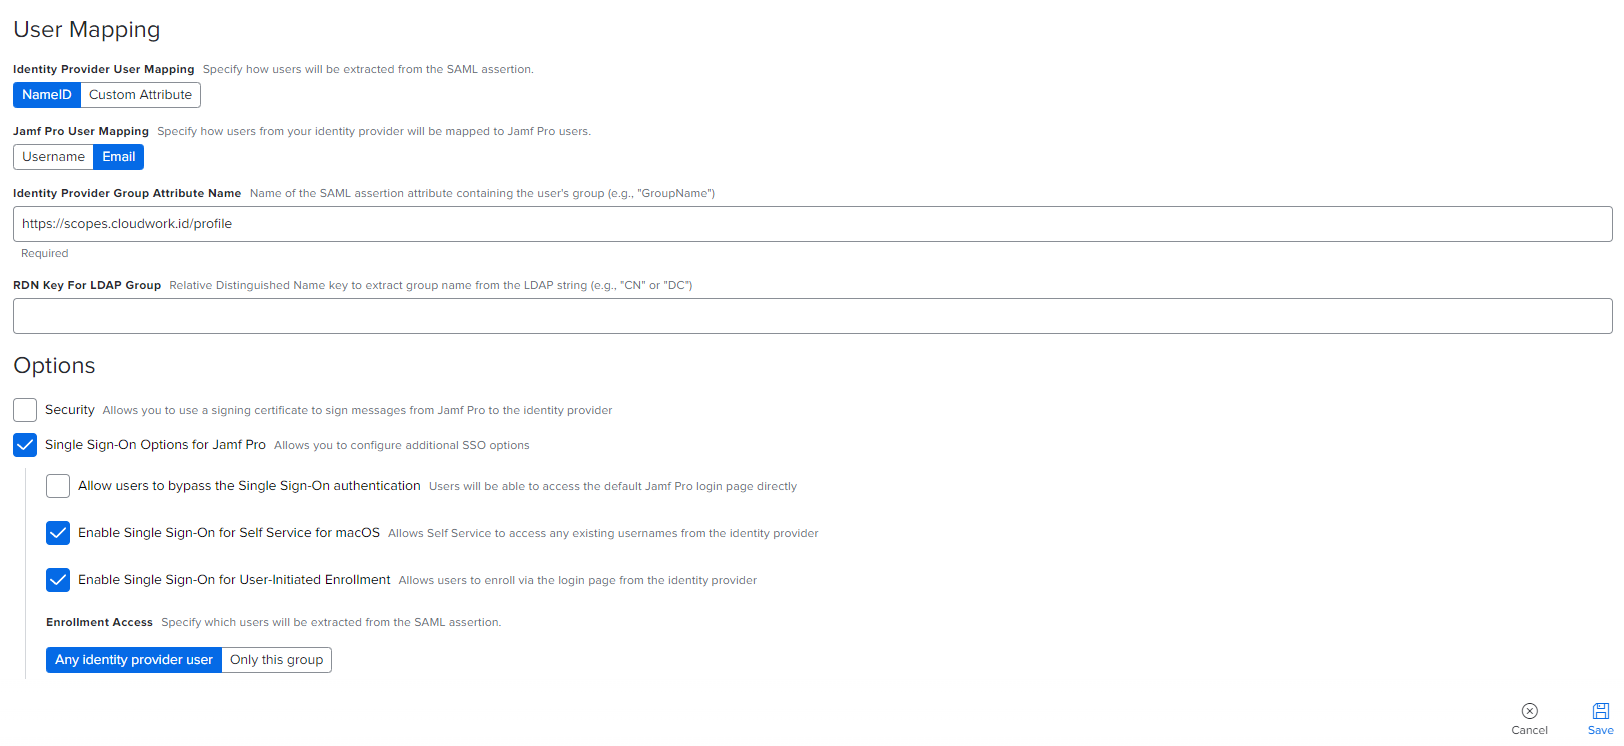
- Identity Provider User Mapping = Set to NameID
- Jamf Pro User Mapping = Set to Email
- Identity Provider Group Attribute Name = Set to https://scopes.cloudwork.id/profile
- RDN Key For LDAP Group = Leave blank
- Options: Select the following options
- Single Sign-On Options for Jamf Pro
- Allow users to bypass the Single Sign-On authentication (Optional Choice)
- Enable Single Sign-On for Self Service for macOS
- Enable Single Sign-On for User-Initiated Enrollment
- Enrollment Access = Set to Any Identity provider user
- Click Save

Example of Jamf Pro Setup part 1

Example of Jamf Pro Setup part 2
Testing Single Sign On
- Login to your Jamf Pro Dashboard
- In the top right corner click the gear
- Click Jamf Pro User Accounts & Groups
- Click New
- For Choose Action select Create standard Account and click Next
- Populate your test user details:
- Notes for populating test user:
- Ensure Username is full email address, and email address field is populated.
- Password entered here will be ignored
- Test SSO by opening a private browsing session and log into your Jamf Pro Server:
- If using Jamf OnPremise, login to: https://<Jamf Pro domain>:8443/saml/metadata
- If using Jamfcloud hosted server, login to: https://<Jamf Pro URL>/saml/metadata
- Notes for populating test user: