Difference between revisions of "User management"
Jrobertson (talk | contribs) |
Jrobertson (talk | contribs) |
||
| Line 128: | Line 128: | ||
This will tell the upload facility that the password is already encrypted and it does not need to do any further encryption. | This will tell the upload facility that the password is already encrypted and it does not need to do any further encryption. | ||
| + | |||
| + | [[Category:Dashboard]] | ||
Revision as of 00:47, 22 November 2017
Users can be accessed through the front panel or via the side menu
Clicking on the active users link or the Users side menu will give a listing of all of the users in the system.
Contents
Creating a New User
You should only need to manually create users for administrative purposes to this dashboard or to create special users that are not synchronised by normal processes.
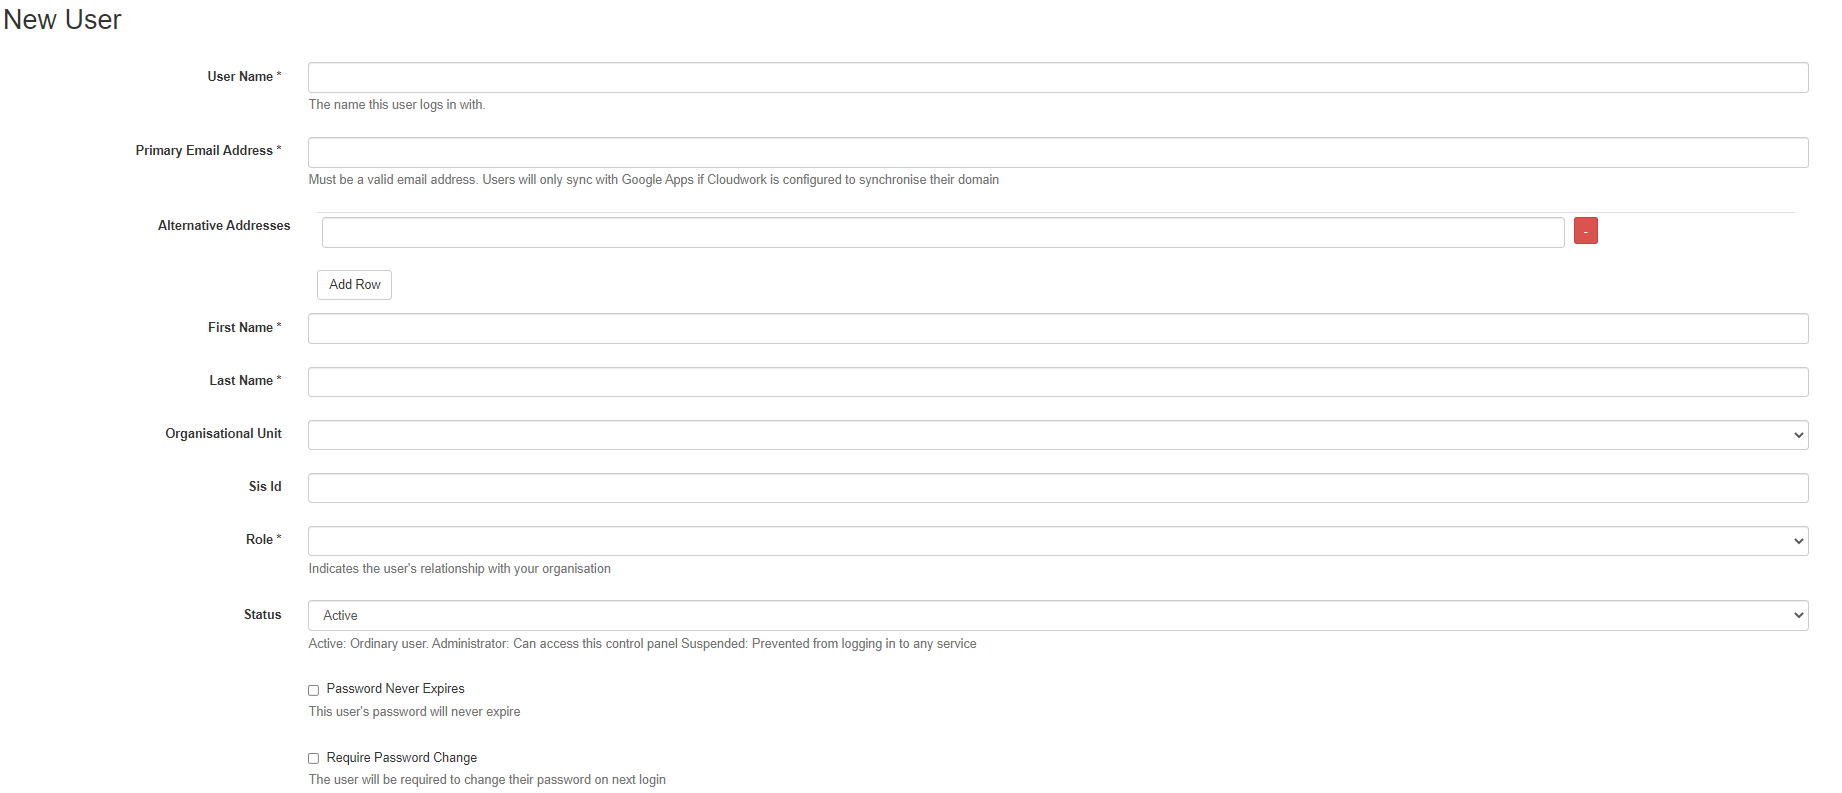
To create a new user simply click on the “Add new user” link either on the home page or on the top menu after clicking on Users in the side menu, this will lead you to the User creation screen.
- Email - This must be a valid email address, something like someone@example.com. If you with this use to be available in a Google apps domain then it must have the same domain as the google apps domain you with to synchronise with
- User Name - This will be the user name that the user will use to log in with.
- Organisational Unit - Distinct group inside an institution
- Sis ID - The ID of the user in the school management system e.g. Edumate, Synergetic
- Role - This will indicate what role this user will have. This will be sent to service providers, some service providers will give different access levels based on what this value is. Default dropdown values are:
- Teacher
- Student
- Alum
- Parent
Please note: Currently all users that are marked at Alum or Parent are not considered chargeable in Cloudwork.
- Status - By default there are three possible statuses
- Active: Ordinary user.
- Administrator: Can access this control panel.
- Suspended: Prevented from logging in to any service
After filling in these details you will be prompted to give the user a password. Once you do that the new user will be ready.
Editing Users
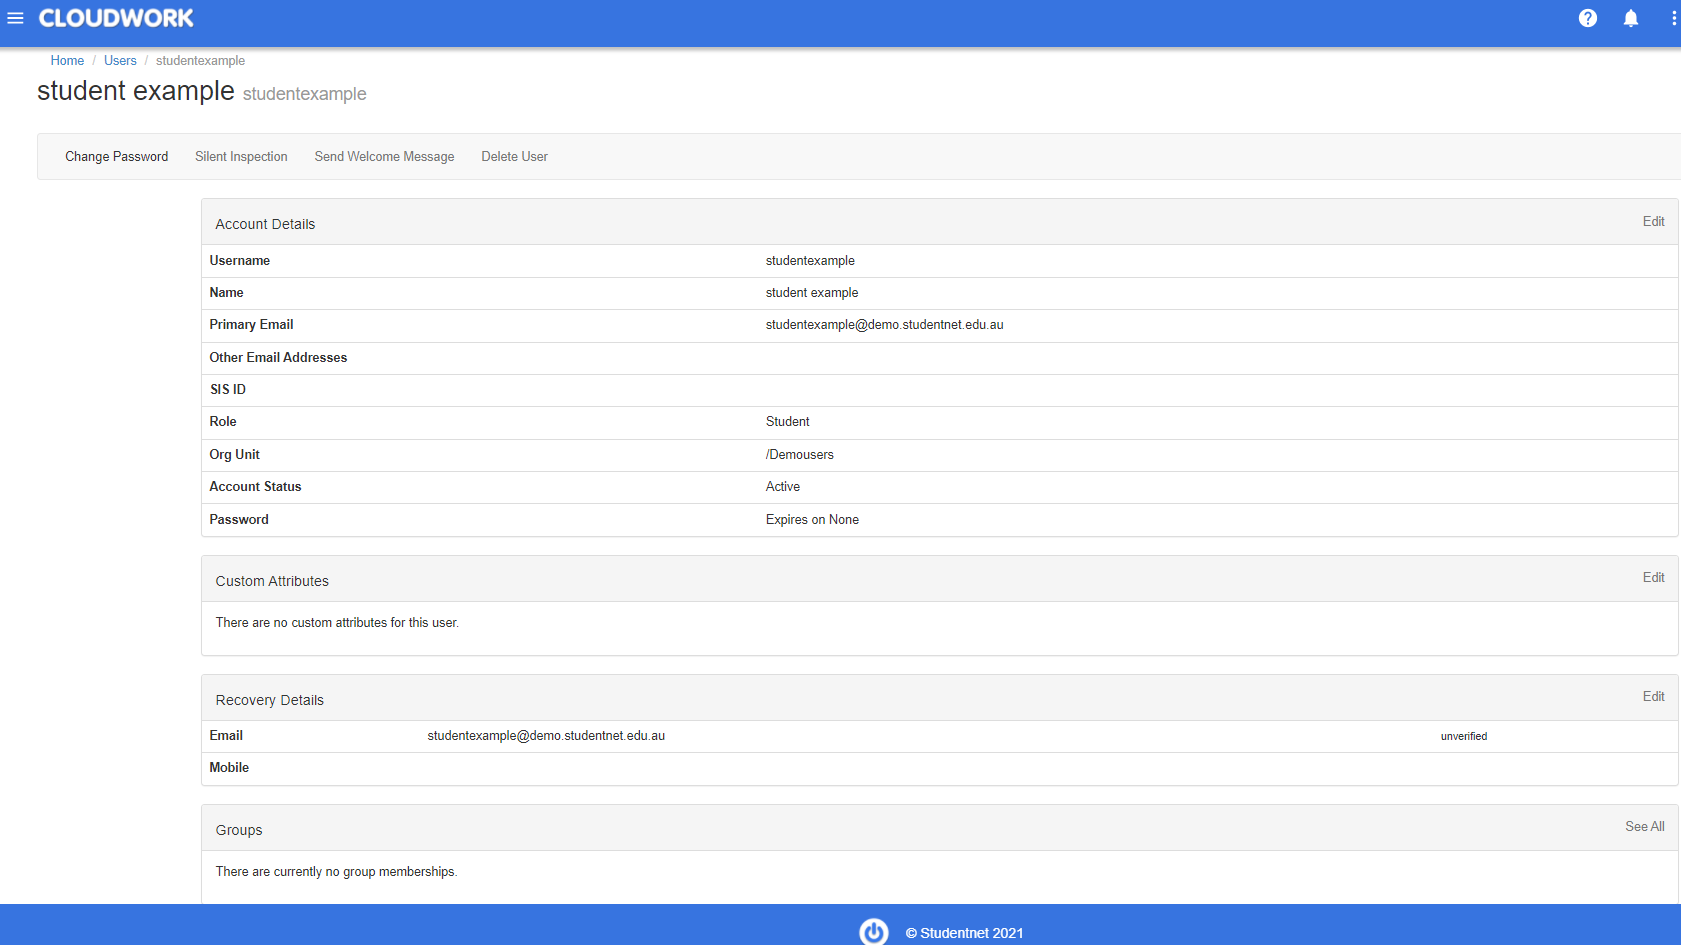
Editing users in this interface is not recommended if you have synchronisation running. Any changes made on the directory will be reflected automatically. This will remain the place to make changes to manual users or special users that are not automatically synchronised. The options on the form remain the same as the Create user form which is described in detail above.
There are, however other options that are available to use, some of these will depend on the options that are available to your institution.
Change Password
This will allow you to change the password of a user. If the user is being synchronised, then this will force the password change back to the directory. If this user is not being synchronised it will only be reflected for this system.
Silent inspection
Silent inspection will allow an administrator to set a temporary password that will also work for that user’s account. This will work for one login or 1 hour (configurable) whichever comes first. This is designed to let an administrator to login as a user without having to change a user’s password.
This feature is not on by default and needs to be specifically requested to be activated.
Send Welcome Message
Send a welcome message created from a template that can be configured in the Message template section in Features
Delete User
This will delete the user from the Cloudwork system. It will also delete the user from any service provider that Cloudwork is provisioning accounts in (e.g. Google Apps), if it is supported. It will not delete the user from the directory.
If this user is synchronising with a directory then it will remain deleted. If you wish to prevent someone from logging in through the Identity provider then it is better to set the status of the user to Suspended. You will be presented with a confirmation screen before the delete is actioned. Use this function with care.
Currently the ability to undelete users is under development.
Bulk User add
Under the user menu is ability to add a bulk list of users. This is generally for users that will not exist in the directory such as parents. To use this facility it will require a csv of the users in a format so that the system can use it.
Your CSV file should contain the following headings:
Email, User Name, First Name, Last Name, Password, Role
e.g. Email, User Name, First Name, Last Name, Password, Role
principal@example.edu.au,principal,School,Principal,pri2009,teacher
joeblogs@example.edu.au,joeblogs,joe,blogs,joe2009,teacher
a.student@example.edu.au,SN1234,Alfred,Student,as2010,student
The following email accounts will be created:
principal@example.edu.au with a password of pri2009
joeblogs@example.edu.au with a password of joe2009
a.student@example.edu.au with a password of as2010, and a SSO username of SN12345678
Valid roles must be chosen from the following list:
- Student
- Alum
- Teacher
- Parent
Recovery Phone Number
This is the phone number that is used in password reset. As with the other headings it must be put exactly as above. This field is not compulsory and may be left out if it is not required.
Recovery Email Address
This is the email address that is used in the in password reset. As with the other headings it must be put exactly as above. This field is not compulsory and may be left out if it is not required.
Additional Attributes
This is where things can get a little more interesting. You can now add additional attributes to the import and will will import them into the Custom Attributes for the user. This can be useful when having to bring additional information for a user that needs to be sent to the service provider, but doesn't quite fit in the existing categories. For example StudentID, SynID etc
These are not compulsory and can be left blank for the users that do not have such a value.
With the extra attributes the CSV file may looks like this:
Email, User Name, First Name, Last Name, Password, Role, Recovery Email, Recovery Phone
principal@example.edu.au,principal,School,Principal,pri2009,teacher, othermail@gmail.com, 0412345678
joeblogs@example.edu.au,joeblogs,joe,blogs,joe2009,teacher, joemail@gmail.com, 045678910
a.student@example.edu.au,SN1234,Alfred,Student,as2010,student, sparemail@gmail.com, 042345678
As well as another attribute called SynID. Once the user logs in, all the normal attributes will be created and sent to the service provider, additionally this user will have SynID sent. NB Password reset information is NOT exposed to service providers.
So when the user is created all the information about the user is already there without need for further interaction.
Just to make things clear on these new attributes, they can be left blank for users that they do not apply, or just simply not included in the import. Remember these imports can be run as scheduled imports through the sync profile interface.
Bulk user add - Encrypted passwords
As a new feature you can now do a bulk user upload with the password being already encrypted. Currently supported encryption formats are BCrypt, SHA1 and MySQL Passwords. To enable the Encrypted Password feature simply adjust the headings to be:
Email, User Name, First Name, Last Name, Encrypted Password, Role
This will tell the upload facility that the password is already encrypted and it does not need to do any further encryption.


