Difference between revisions of "Adobe Cloud"
| Line 21: | Line 21: | ||
===Configure SAML Settings=== | ===Configure SAML Settings=== | ||
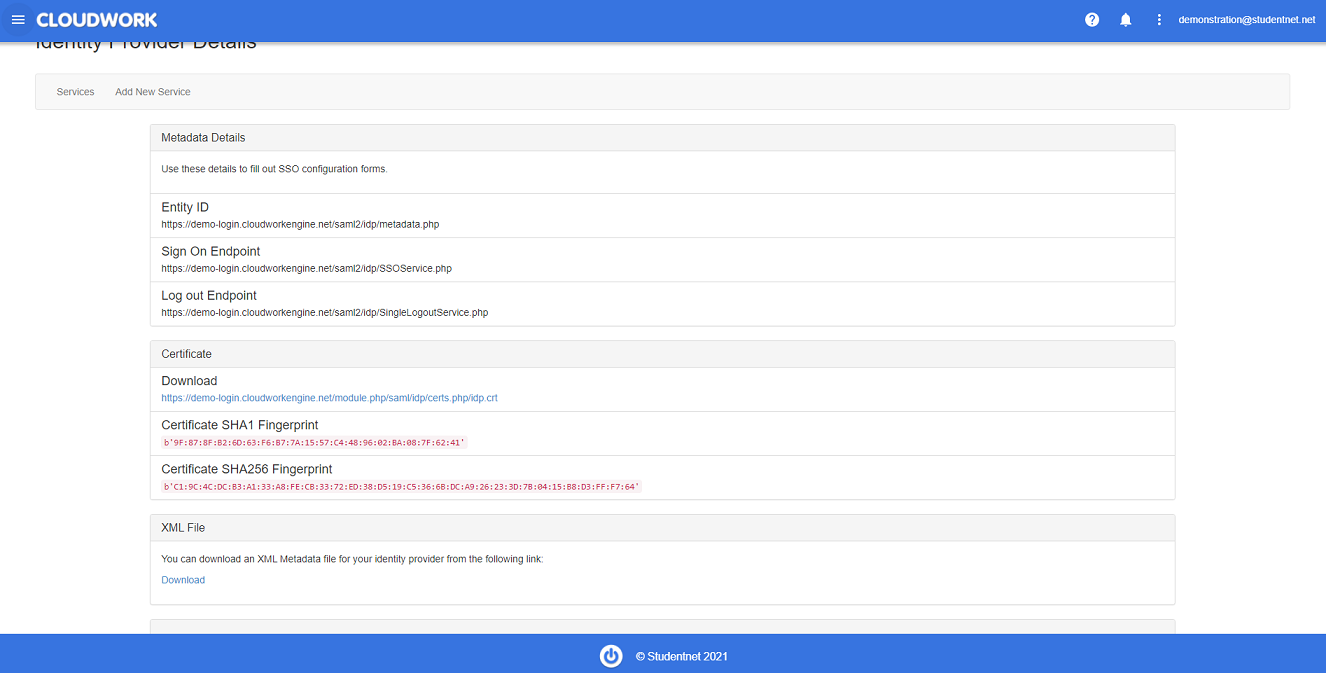
| − | You can find this information in the Cloudwork Dashboard under '''Single Sign On''' > '''Identity Provider''' | + | You can find this information in the Cloudwork Dashboard under '''Single Sign On''' > '''Identity Provider''' <br>[[File:idp_info.PNG|centre|frame|Example Identify Provider Information]] |
| − | |||
| − | [[File:idp_info.PNG|centre|frame|Example Identify Provider Information]] | ||
*Entity ID/Issuer URL: This is listed under '''Single Sign On''' > '''Identity Provider'''>'''Metadata Details'''>'''Entity ID''' ''(In the example photo this value will be https://demo-login.cloudworkengine.net/saml2/idp/metadata.php)'' | *Entity ID/Issuer URL: This is listed under '''Single Sign On''' > '''Identity Provider'''>'''Metadata Details'''>'''Entity ID''' ''(In the example photo this value will be https://demo-login.cloudworkengine.net/saml2/idp/metadata.php)'' | ||
Revision as of 05:02, 12 October 2021
These instructions are for Adobe Single Sign On
Contents
SSO Setup with Adobe
To set up a directory:
- Login to Adobe Admin Console here
- Navigate to Settings>Create Directory
- Enter a directory name
- Select Federated ID
- Adobe will provision the directory. This usually takes up to 48 hours.
- After you receive the email from Adobe confirming that your directory is provisioned, configure the SAML settings for the directory.
Verifying Domain with Adobe
- Contact Adobe support with the following information:
- Email address of your Adobe Sign Account Adminstrator
- The domain that needs to be claimed. Eg. <schoolname>.nsw.edu.au
- Wait for a reply from Adobe giving a TXT record.
- Publish the TXT record in the domain you wished to claim(This will require you to contact the one in charge of your domain's zone file)
Configure SAML Settings
You can find this information in the Cloudwork Dashboard under Single Sign On > Identity Provider
- Entity ID/Issuer URL: This is listed under Single Sign On > Identity Provider>Metadata Details>Entity ID (In the example photo this value will be https://demo-login.cloudworkengine.net/saml2/idp/metadata.php)
- Login URL/SSO Endpoint: This is listed under Single Sign On > Identity Provider>Metadata Details>Sign On Endpoint (In the example photo this value will be https://demo-login.cloudworkengine.net/saml2/idp/SSOService.php)
- Logout URL/SLO Endpoint: This is listed under Single Sign On > Identity Provider>Metadata Details>Log Out Endpoint (In the example photo this value will be https://demo-login.cloudworkengine.net/saml2/idp/SingleLogoutService.php)
- IdP Certificate: Single Sign On > Identity Provider>Certificate>Download
SSO setup with Cloudwork
When prompted to download the metadata file, you can either email it to us and we will import it for you, or you can follow the instructions below:
1. Go to your Cloudwork dashboard.
2. Click Add New Service.
3. Click Upload an XML File.
- Give the service a recognisable name (eg, Adobe Enterprise), select the file, and click Submit.
4. Go back to the Services List and select the newly created service.
5. Edit the Attribute Map and update the "Maps to" values as follows:
- First Name: FirstName
- Last Name: LastName
- Email: Email
6. Click Submit.
7. In the SAML Configuration section edit the newly created service and change NameID Value to Email or Username, depending on your chosen identifier (ie. the User login setting which you specified on the Adobe form).
8. Click Submit.
