Difference between revisions of "Frontier"
Jump to navigation
Jump to search
(Created page with " ==SSO Setup with Frontier== #Download your school's metadata by going to '''Cloudwork Dashboard'''>'''Single Sign On'''>'''Identity Provider'''>'''XML file'''>'''Download'''<...") |
|||
| (2 intermediate revisions by the same user not shown) | |||
| Line 3: | Line 3: | ||
#Download your school's metadata by going to '''Cloudwork Dashboard'''>'''Single Sign On'''>'''Identity Provider'''>'''XML file'''>'''Download'''<br>[[File:Xml_download.PNG|300px|centre|frame|Location of XML File Download]] | #Download your school's metadata by going to '''Cloudwork Dashboard'''>'''Single Sign On'''>'''Identity Provider'''>'''XML file'''>'''Download'''<br>[[File:Xml_download.PNG|300px|centre|frame|Location of XML File Download]] | ||
#Save your school's metadata on your computer. ''Take note of where you save the file and the file name as you will need to send this to Frontier'' | #Save your school's metadata on your computer. ''Take note of where you save the file and the file name as you will need to send this to Frontier'' | ||
| − | #Email | + | #Email Frontier and request for their metadata and give them your school's metadata(This is the metadata file saved from step 2) |
===Email Template=== | ===Email Template=== | ||
<blockquote> | <blockquote> | ||
Hi Frontier,<br> | Hi Frontier,<br> | ||
| − | Attached is '''<school>''' metadata file.<br> | + | Attached is '''<school name>''' metadata file.<br> |
Could you please provide Frontier's metadata file | Could you please provide Frontier's metadata file | ||
</blockquote> | </blockquote> | ||
| Line 14: | Line 14: | ||
#After receiving Frontier's metadata file and saved it to your pc | #After receiving Frontier's metadata file and saved it to your pc | ||
#Login to the '''Cloudwork Dashboard'''>'''Single Sign On'''>'''Add New Service'''>'''Upload an XML File''' | #Login to the '''Cloudwork Dashboard'''>'''Single Sign On'''>'''Add New Service'''>'''Upload an XML File''' | ||
| − | #Enter '''Frontier''' into the | + | #Enter '''Frontier''' into the '''Name''' field |
| − | #Choose the metadata file you received from Frontier | + | #Under '''Choose an XML File''' Choose the metadata file you received from Frontier |
| − | |||
#Click submit | #Click submit | ||
#Click '''Service''' | #Click '''Service''' | ||
| Line 33: | Line 32: | ||
#* '''Role''': '''role''' | #* '''Role''': '''role''' | ||
#* '''Groups''': '''groups''' | #* '''Groups''': '''groups''' | ||
| − | #* '''Email''': '''UPN'''<br>[[File:Frontier_Att_Map.PNG| | + | #* '''Email''': '''UPN'''<br>[[File:Frontier_Att_Map.PNG|150px|centre|frame|Example of Frontier Attribute Map]] |
#Click '''Submit''' | #Click '''Submit''' | ||
[[Category:Single Sign On Services]] | [[Category:Single Sign On Services]] | ||
Latest revision as of 22:14, 17 January 2022
SSO Setup with Frontier
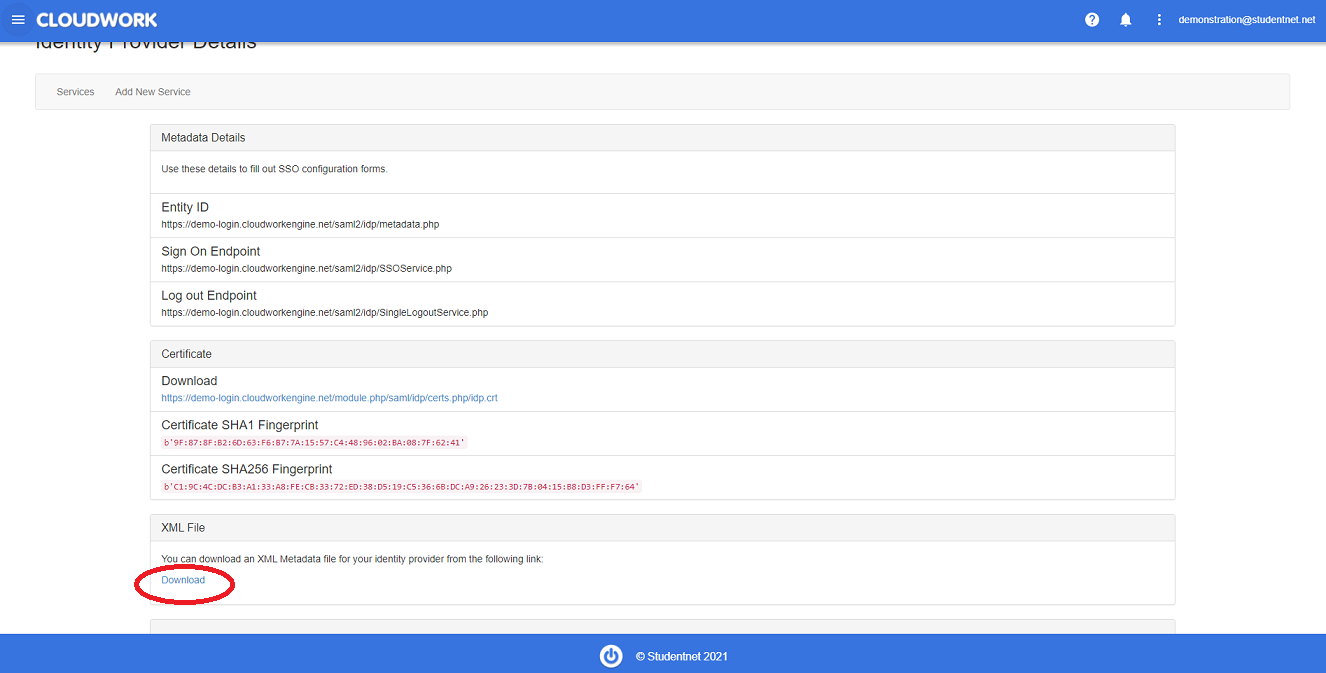
- Download your school's metadata by going to Cloudwork Dashboard>Single Sign On>Identity Provider>XML file>Download
- Save your school's metadata on your computer. Take note of where you save the file and the file name as you will need to send this to Frontier
- Email Frontier and request for their metadata and give them your school's metadata(This is the metadata file saved from step 2)
Email Template
Hi Frontier,
Attached is <school name> metadata file.
Could you please provide Frontier's metadata file
SSO Setup with Cloudwork
- After receiving Frontier's metadata file and saved it to your pc
- Login to the Cloudwork Dashboard>Single Sign On>Add New Service>Upload an XML File
- Enter Frontier into the Name field
- Under Choose an XML File Choose the metadata file you received from Frontier
- Click submit
- Click Service
- Navigate to Frontier in the Service's List
- Click Frontier
- In the the table SAML Config Click 'Edit
- In Signature Algorithm in the drop down select SHA256
- Click Submit
- Navigate to Attribute Map click Edit
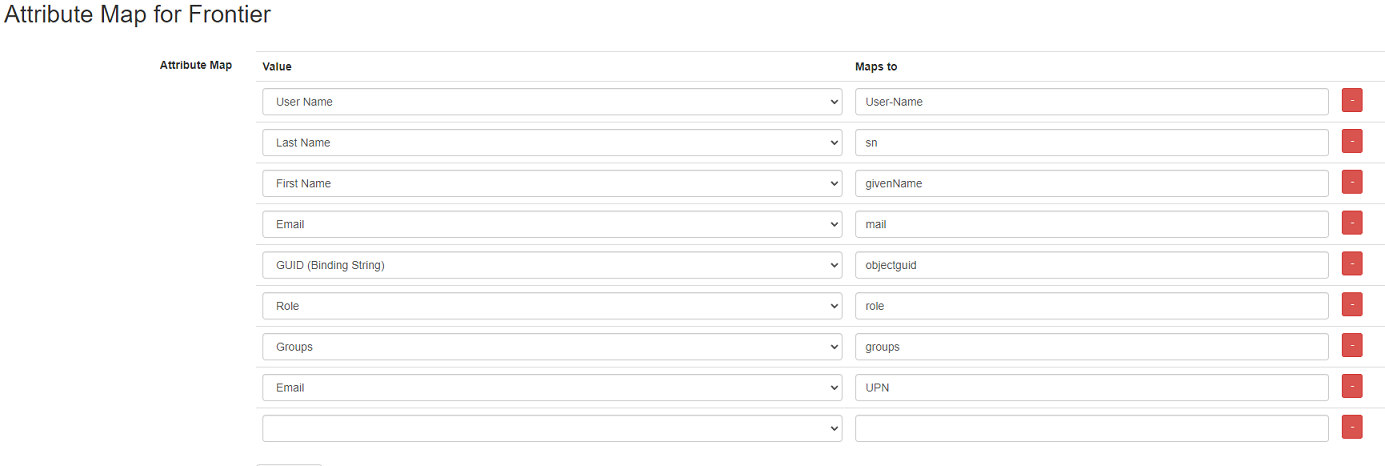
- Configure Attribute Map as follows:
- User Name: User-Name
- Last Name: sn
- First Name: givenName
- Email: mail
- GUID (Binding String): objectguid
- Role: role
- Groups: groups
- Email: UPN
- Click Submit

