Difference between revisions of "Features"
Jrobertson (talk | contribs) |
|||
| (18 intermediate revisions by 2 users not shown) | |||
| Line 5: | Line 5: | ||
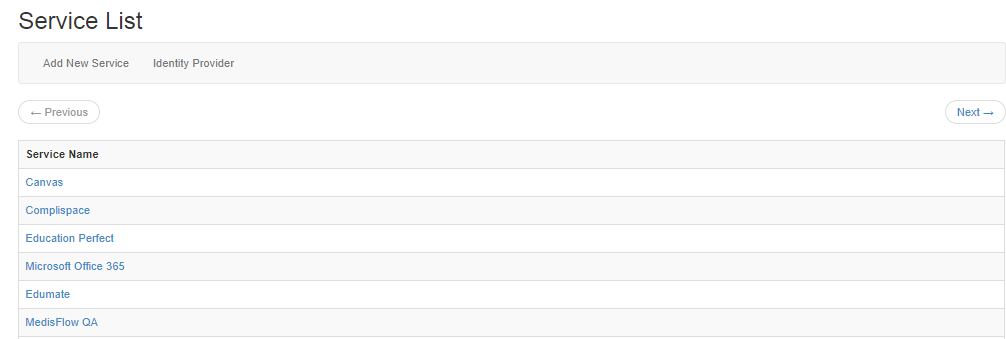
This is a list of the services that are connected to the system and provides information on the identity provider. | This is a list of the services that are connected to the system and provides information on the identity provider. | ||
| − | [[File:service_list.png]] | + | [[File:service_list.png|900px]] |
| + | ''Example of a service list'' | ||
New services can be added and information about each service can be easily accessed. | New services can be added and information about each service can be easily accessed. | ||
| Line 11: | Line 12: | ||
=== Identity Provider Details === | === Identity Provider Details === | ||
| − | These are the metadata details of the identity provider. They include: | + | These are the metadata details of the identity provider that can be accessed through the single sign on page. They include: |
| − | *Entity ID | + | *Entity ID - Is also the metadata URL |
| − | *Sign On Endpoint | + | |
| − | *Logout Endpoint | + | *Sign On Endpoint - Otherwise known as ACS, or Assertion Consumer Endpoint |
| + | |||
| + | *Logout Endpoint - Otherwise known SLS or SLO endpoint | ||
| + | |||
*Certificate - the certificate is available to download | *Certificate - the certificate is available to download | ||
| − | *XML file download - You can download an XML Metadata file for | + | |
| + | *XML file download - You can download an XML Metadata file for the identity provider as some services require this as an XML file | ||
== Log in Theme == | == Log in Theme == | ||
| + | This page contains customisable settings for the login page, password reset page and welcome page. | ||
| + | |||
| + | === Display Options === | ||
| + | |||
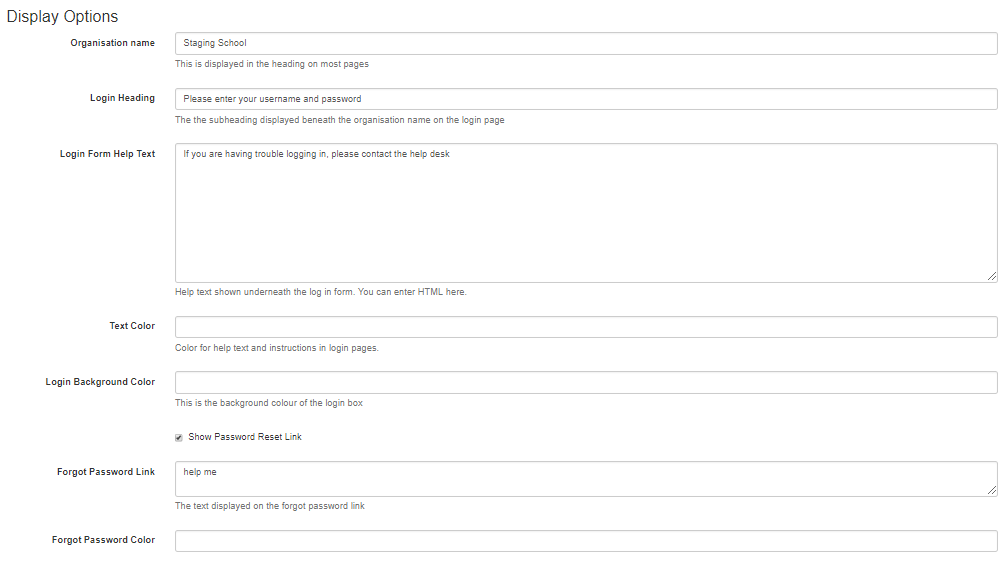
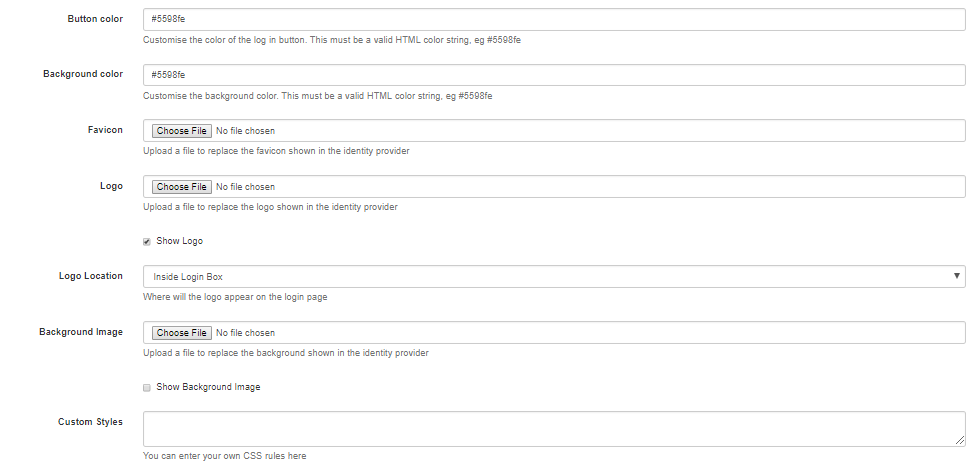
| + | The display options show a variety of settings that can be changed for the login screen. An example of the form can be found below. | ||
| + | |||
| + | [[File:login1.png|900px]] | ||
| + | [[File:login2.png|900px]] | ||
| + | |||
| + | *Organisation Name - The name of the organisation, this is displayed on the login page and most other pages. | ||
| + | |||
| + | *Login Heading - The heading displayed beneath the organisation name on the login page and gives a general description on what to do. | ||
| + | |||
| + | *Login Form Help Text - Help text shown beneath the log in form, to aid the user in what to do if they are unable to log in. HTML can be entered here. | ||
| + | |||
| + | *Text colour - Colour for the help text and instructions on the login page | ||
| + | |||
| + | *Login Background Colour - The colour of the background on the login box. | ||
| + | |||
| + | *Forgot Password Link - The text displayed on the forgot password link. | ||
| + | |||
| + | *Forgot Password Colour - The colour of the text above. | ||
| + | |||
| + | *Button Colour - Customise the color of the log in button. This must be a valid HTML color string, e.g. #5598fe | ||
| + | |||
| + | *Background Colour - Customise the background color. This must be a valid HTML color string, e.g. #5598fe | ||
| + | |||
| + | *Favicon - Upload a file to replace the favicon shown in the identity provider. | ||
| + | |||
| + | *Logo - Upload a file to replace the logo shown in the identity provider. | ||
| + | |||
| + | *Logo Location - Where will the logo appear on the login page. | ||
| + | |||
| + | *Background Image - Upload a file to replace the background shown in the identity provider. | ||
| + | |||
| + | *Custom Styles - You can enter your own CSS rules here to create a custom style. | ||
| + | |||
| + | === Password Reset Options === | ||
| + | |||
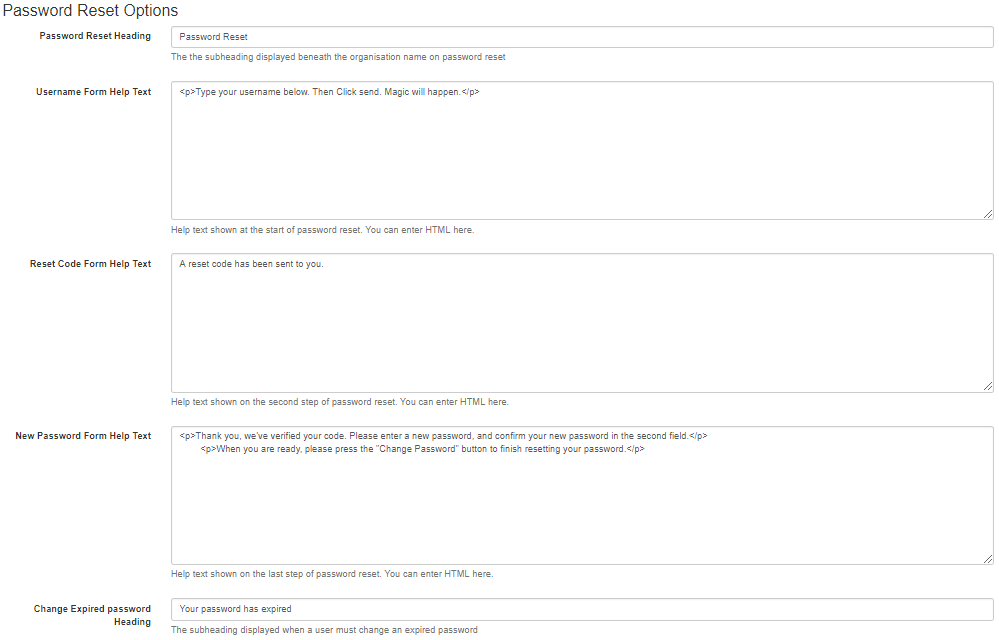
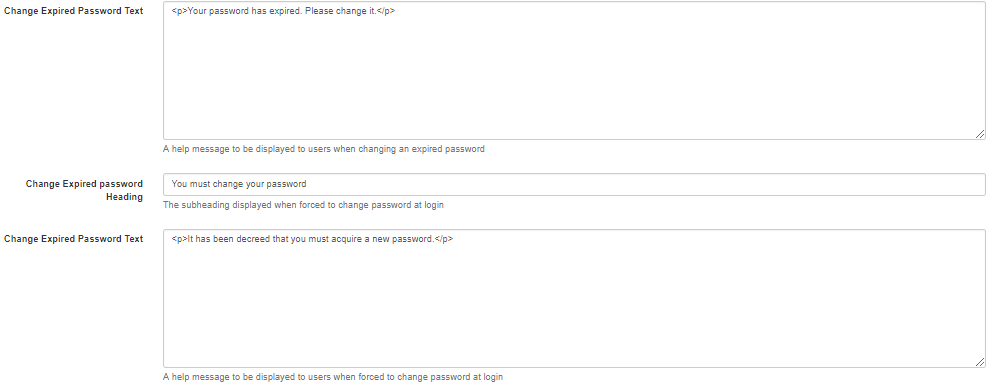
| + | These are the settings for password reset or expiry messages that may be presented to the user when they are logging in. An example of the form can be found below. | ||
| + | |||
| + | [[File:password1.png|900px]] | ||
| + | [[File:password2.png|900px]] | ||
| + | |||
| + | *Password Reset Heading - The subheading displayed beneath the organisation name on password reset. | ||
| + | |||
| + | *Username Form Help Text - Help text shown at the start of password reset where the user enters their username to access a password reset code. You can enter HTML here. | ||
| + | |||
| + | *Reset Code Form Help Text - Help text shown on the second step of password reset. You can enter HTML here. | ||
| + | |||
| + | *New Password Form Help Text - Help text shown on the last step of password reset where the user enters their new password. You can enter HTML here. | ||
| + | |||
| + | *Change Expired Password Heading - The subheading displayed when a user must change an expired password. | ||
| + | |||
| + | *Change Expired Password Text - A help message to be displayed to users when changing an expired password. | ||
| + | |||
| + | === Other Options === | ||
| + | |||
| + | These options currently only change the Welcome text and the Frame Ancestors. This form can be seen below. | ||
| + | |||
| + | [[File:other.png|900px]] | ||
| + | |||
| + | *Welcome Text - Customise the text shown when users go to the root domain for your IDP. | ||
| + | |||
| + | *Frame Ancestors - If you wish to embed the login page inside a web page of your own list the URL of the page you want to embed it into here. | ||
== Canvas Sync == | == Canvas Sync == | ||
| + | This allows for syncing with a Canvas site. Only the URL is required and this is for class and user provisioning in Canvas rather than Canvas single sign on. | ||
| + | |||
| + | An example of the form for Canvas syncing can be found below | ||
| + | |||
| + | [[File:canvas_sync.png]] | ||
| − | == Google | + | == Google Suite Domain == |
| + | See [https://wiki.studentnet.net/index.php?title=G_Suite_Domains Google Suite Domain] | ||
== Message Templates == | == Message Templates == | ||
| Line 97: | Line 173: | ||
*Template - This is the automated message sent out to a user who requests a password change or requires password recovery, it can be changed in the Message templates section of Features. | *Template - This is the automated message sent out to a user who requests a password change or requires password recovery, it can be changed in the Message templates section of Features. | ||
| − | + | [[Category:Cloudwork Dashboard]] | |
Latest revision as of 04:28, 29 November 2019
Manage your settings for 3rd party services.
Contents
Single Sign On
This is a list of the services that are connected to the system and provides information on the identity provider.
New services can be added and information about each service can be easily accessed.
Identity Provider Details
These are the metadata details of the identity provider that can be accessed through the single sign on page. They include:
- Entity ID - Is also the metadata URL
- Sign On Endpoint - Otherwise known as ACS, or Assertion Consumer Endpoint
- Logout Endpoint - Otherwise known SLS or SLO endpoint
- Certificate - the certificate is available to download
- XML file download - You can download an XML Metadata file for the identity provider as some services require this as an XML file
Log in Theme
This page contains customisable settings for the login page, password reset page and welcome page.
Display Options
The display options show a variety of settings that can be changed for the login screen. An example of the form can be found below.
- Organisation Name - The name of the organisation, this is displayed on the login page and most other pages.
- Login Heading - The heading displayed beneath the organisation name on the login page and gives a general description on what to do.
- Login Form Help Text - Help text shown beneath the log in form, to aid the user in what to do if they are unable to log in. HTML can be entered here.
- Text colour - Colour for the help text and instructions on the login page
- Login Background Colour - The colour of the background on the login box.
- Forgot Password Link - The text displayed on the forgot password link.
- Forgot Password Colour - The colour of the text above.
- Button Colour - Customise the color of the log in button. This must be a valid HTML color string, e.g. #5598fe
- Background Colour - Customise the background color. This must be a valid HTML color string, e.g. #5598fe
- Favicon - Upload a file to replace the favicon shown in the identity provider.
- Logo - Upload a file to replace the logo shown in the identity provider.
- Logo Location - Where will the logo appear on the login page.
- Background Image - Upload a file to replace the background shown in the identity provider.
- Custom Styles - You can enter your own CSS rules here to create a custom style.
Password Reset Options
These are the settings for password reset or expiry messages that may be presented to the user when they are logging in. An example of the form can be found below.
- Password Reset Heading - The subheading displayed beneath the organisation name on password reset.
- Username Form Help Text - Help text shown at the start of password reset where the user enters their username to access a password reset code. You can enter HTML here.
- Reset Code Form Help Text - Help text shown on the second step of password reset. You can enter HTML here.
- New Password Form Help Text - Help text shown on the last step of password reset where the user enters their new password. You can enter HTML here.
- Change Expired Password Heading - The subheading displayed when a user must change an expired password.
- Change Expired Password Text - A help message to be displayed to users when changing an expired password.
Other Options
These options currently only change the Welcome text and the Frame Ancestors. This form can be seen below.
- Welcome Text - Customise the text shown when users go to the root domain for your IDP.
- Frame Ancestors - If you wish to embed the login page inside a web page of your own list the URL of the page you want to embed it into here.
Canvas Sync
This allows for syncing with a Canvas site. Only the URL is required and this is for class and user provisioning in Canvas rather than Canvas single sign on.
An example of the form for Canvas syncing can be found below
Google Suite Domain
Message Templates
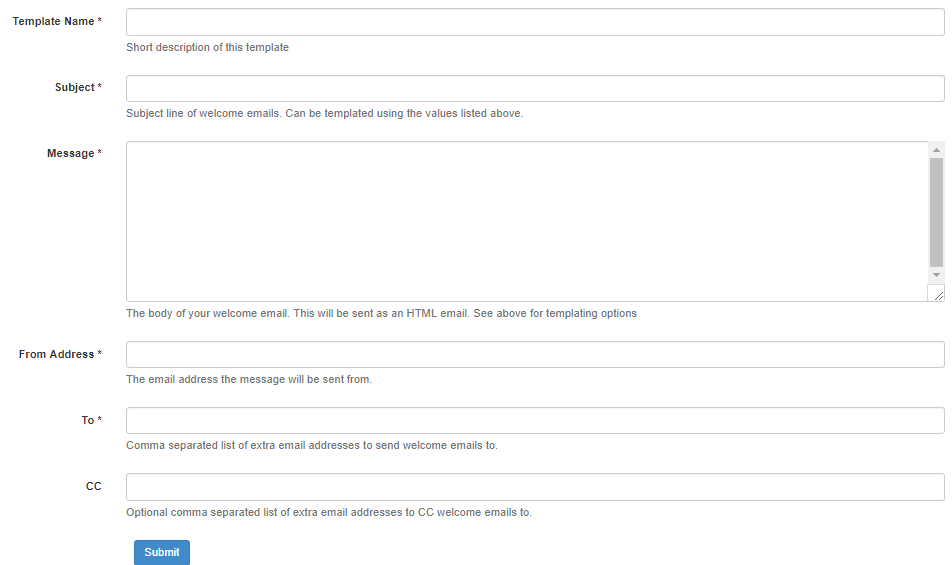
A range of templates for messaging can be created and organised with the message templates list. The New Message Template button leads to a choice between a Welcome Email template and a Forgotten password template.
Welcome Email template
This template can be used when sending welcome messages to new users.
You can use the following special formatting options in this message:
- $user_name: The new user's username.
- $email: The new user's email address.
- $first_name: The new user's first name.
- $last_name: The new user's last name.
- $password_reset_link: A link to start the Password Recovery process.
- $change_password_link: A unique link for this user to immediately change their password.
- $recovery_email: The new user's recovery email address.
- $recovery_phone: The new user's recovery phone number.
You can also use any extra attributes your users might have, such as $salutation or $SIS_ID. Please note that a formatting option that does not match the above list or a user's custom attributes will be left in your email unchanged.
An example of the form for writing a Welcome Email template can be found below.
Forgotten Password template
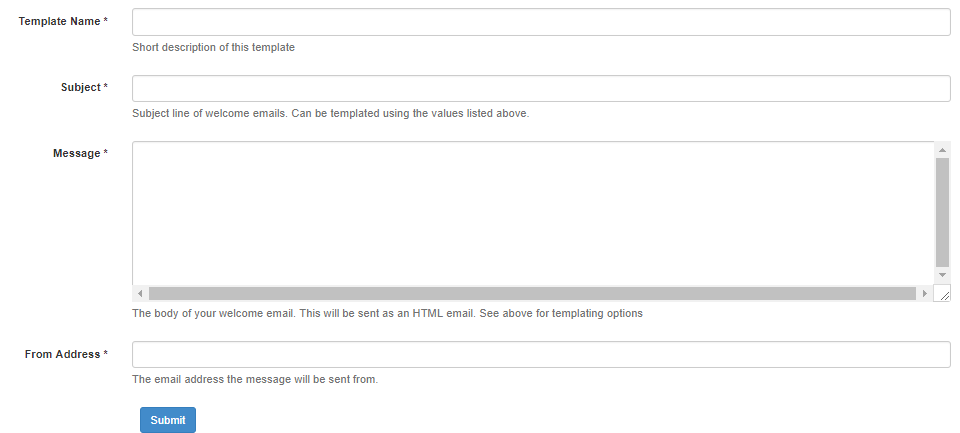
This template can be used when sending recovery codes via email for users who are attempting to reset their password.
You can use the following special formatting options in this message:
- $user_name: The user's username.
- $code: The recovery code needed by the user to reset their password.
- $continue_link: A link to continue the Password Recovery process.
- $email: The user's email address.
- $first_name: The user's first name.
- $last_name: The user's last name.
- $password_reset_link: A link to initiate Password Recovery.
- $recovery_email: The user's recovery email address.
- $recovery_phone: The user's recovery phone number.
An example of the form for writing a forgotten password template and an example of a message can be found below.
Example Password recovery message
Hi $first_name,
You've recently made a request to reset your Cloudwork password. <a href="$continue_link">Click here to reset your password</a>, or provide the following code in your browser:
$code
If you did not try to reset your password, please ignore this email.
Sincerely,
The Studentnet Support Team
Password Recovery settings
These involve different settings regarding password recovery.
- Nag screen - This can be switched on or off to prompt a user to provide password recovery data if they have not already provided it
- Message format - This setting can change where the user receives the recovery message. The options at the moment include:
- Let User choose
- Always send recovery code via Mobile
- Always send recovery code via Email
- Template - This is the automated message sent out to a user who requests a password change or requires password recovery, it can be changed in the Message templates section of Features.
