Difference between revisions of "Canvas Sync Integration"
Jump to navigation
Jump to search
Jrobertson (talk | contribs) |
Jrobertson (talk | contribs) |
||
| Line 6: | Line 6: | ||
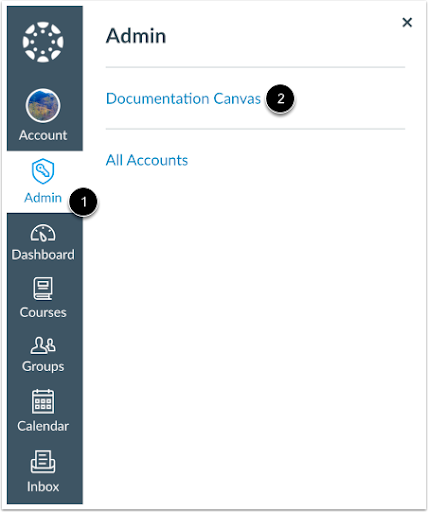
# In Global Navigation, click the Admin link and select the account<br>[[Image:canvasint1.png]]<br> | # In Global Navigation, click the Admin link and select the account<br>[[Image:canvasint1.png]]<br> | ||
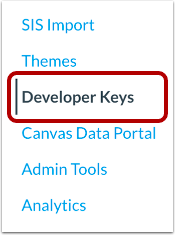
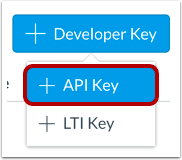
| − | # On the Account Navigation Panel, click on the Developer Keys > Add Developer Key > API Key<br>[[Image:canvasint2.png]][[Image:canvasint3.png]] | + | # On the Account Navigation Panel, click on the Developer Keys > Add Developer Key > API Key<br>[[Image:canvasint2.png]][[Image:canvasint3.png]]<br> |
| + | # On Key Settings > Required Fields:<br> * Key Name: Cloudwork <br> * Redirect URIs: <Cloudwork URL>/canvas/authorize Example: https://demo-login.cloudworkengine.net/canvas/authorize<br>[[Image:canvasint4.png]]<br> | ||
| + | # Once set up, switch '''ON''' the state of the developer key. Both Client ID and Secret Key will be listed under Details | ||
| + | |||
[[Category: Cloudwork Dashboard]] | [[Category: Cloudwork Dashboard]] | ||
Revision as of 04:09, 21 January 2025
Setting up
In your Canvas Instructure
- In Global Navigation, click the Admin link and select the account
- On the Account Navigation Panel, click on the Developer Keys > Add Developer Key > API Key
- On Key Settings > Required Fields:
* Key Name: Cloudwork
* Redirect URIs: <Cloudwork URL>/canvas/authorize Example: https://demo-login.cloudworkengine.net/canvas/authorize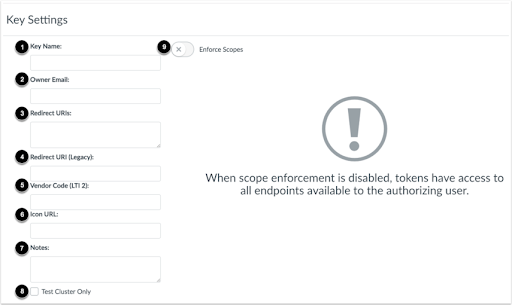
- Once set up, switch ON the state of the developer key. Both Client ID and Secret Key will be listed under Details


