Difference between revisions of "Elcom"
Jump to navigation
Jump to search
| (One intermediate revision by the same user not shown) | |||
| Line 1: | Line 1: | ||
==SSO Setup Elcom side== | ==SSO Setup Elcom side== | ||
| − | #Login to the | + | #Login to the '''Cloudwork dashboard'''>'''Single Sign On'''>'''Identity Provider''' |
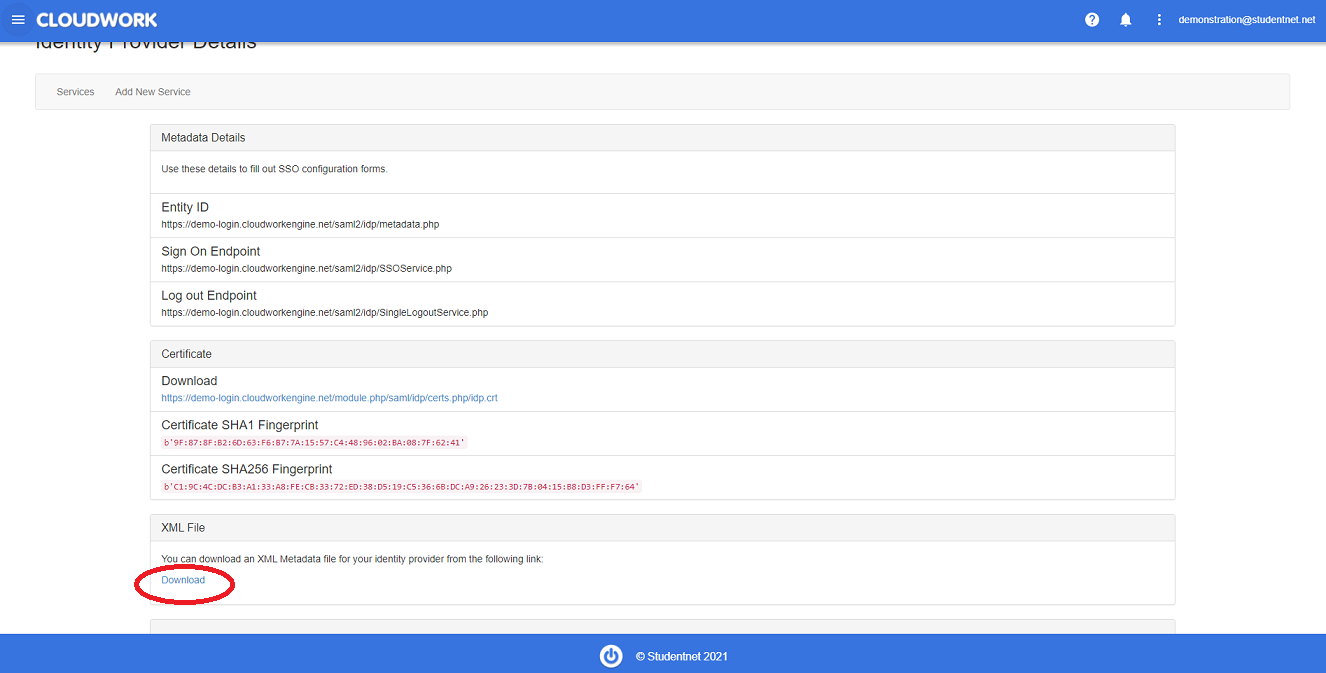
| − | #Under XML file click Download | + | #Under '''XML file''' click '''Download'''<br>[[File:Xml_download.PNG|300px|centre|frame|Location of XML File Download]] |
| − | #Email the XML file | + | #Email Elcom asking for their XML File and attach the XML file from Step 2. |
| + | ===Email Template=== | ||
| + | <blockquote> | ||
| + | Hi Elcom Support,<br> | ||
| + | |||
| + | Our school <school name> is wanting to setup SSO with Cloudwork.<br> | ||
| + | Could you please send over Elcom's XML File so we can setup SSO on Cloudwork's end.<br> | ||
| + | Attached is our school's XML File. | ||
| + | </blockquote> | ||
==SSO Setup with Cloudwork== | ==SSO Setup with Cloudwork== | ||
| − | #Login to the | + | #After receiving the XML file from Elcom |
| + | #Login to the '''Cloudwork Dashboard'''>'''Single Sign On'''>'''Add New Service'''>'''Upload an XML File''' | ||
#Enter Elcom into the name | #Enter Elcom into the name | ||
#Choose the XML file you received from Elcom | #Choose the XML file you received from Elcom | ||
Latest revision as of 01:32, 12 October 2021
SSO Setup Elcom side
- Login to the Cloudwork dashboard>Single Sign On>Identity Provider
- Under XML file click Download
- Email Elcom asking for their XML File and attach the XML file from Step 2.
Email Template
Hi Elcom Support,
Our school <school name> is wanting to setup SSO with Cloudwork.
Could you please send over Elcom's XML File so we can setup SSO on Cloudwork's end.
Attached is our school's XML File.
SSO Setup with Cloudwork
- After receiving the XML file from Elcom
- Login to the Cloudwork Dashboard>Single Sign On>Add New Service>Upload an XML File
- Enter Elcom into the name
- Choose the XML file you received from Elcom
- Upload the file
- Click submit
