Difference between revisions of "Foldr"
Jump to navigation
Jump to search
(Created page with "==Foldr== ===SSO Setup with Cloudwork=== #Login to '''Cloudwork Dashboard''' #Navigate to '''Single Sign On'''>'''Add New Service'''>'''Custom SAML Service''' #Fill the form:...") |
|||
| (3 intermediate revisions by the same user not shown) | |||
| Line 1: | Line 1: | ||
==Foldr== | ==Foldr== | ||
| − | |||
| − | |||
#Login to '''Cloudwork Dashboard''' | #Login to '''Cloudwork Dashboard''' | ||
#Navigate to '''Single Sign On'''>'''Add New Service'''>'''Custom SAML Service''' | #Navigate to '''Single Sign On'''>'''Add New Service'''>'''Custom SAML Service''' | ||
| Line 11: | Line 9: | ||
#*'''NameID Value''': '''Email''' | #*'''NameID Value''': '''Email''' | ||
#*'''NameID Format''': '''urn:oasis:names:tc:SAML:1.1:nameid-format:unspecified''' | #*'''NameID Format''': '''urn:oasis:names:tc:SAML:1.1:nameid-format:unspecified''' | ||
| − | #*'''Login URL''': Leave blank | + | #*'''Login URL''': Leave blank<br>[[File:Foldr_example.PNG|300px|centre|frame|Example of Foldr Configuration]] |
#Click '''Submit''' | #Click '''Submit''' | ||
#Make note of '''Entity ID''' and '''Sign On Endpoint''' | #Make note of '''Entity ID''' and '''Sign On Endpoint''' | ||
| − | #Under '''Certificate''' click '''Download''' | + | #Under '''Certificate''' click '''Download'''<br>[[File:Service_after.PNG|300px|centre|frame|Certificate Download]] |
| + | #Log in to '''Foldr settings''' | ||
| + | #Navigate to '''Single Sign-On'''>'''Service Provider''' | ||
| + | #Set '''Enable SSO with external Identity Provider?''' to '''On''' | ||
| + | #The '''Entity ID''' and '''Sign On Endpoint''' from step 5, paste the value into the following fields | ||
| + | #*'''Issuer''': ''<Entity ID Value from Step 5>'' | ||
| + | #*'''Sign-In Url''': ''<Sign on Endpoint from Step 5>'' | ||
| + | #Open the '''Certificate''' from Step 6 and copy the content of the certificate. | ||
| + | #In '''Foldr Settings'''>Single Sign-On'''>'''Service Provider''' paste the certificate contents from step 11 into '''Validation Certificate''' | ||
| + | #Click '''Regenerate Certificates''' | ||
| + | #Click '''Save'' at top of page | ||
| + | #In to '''Foldr settings'''>'''Single Sign-On'''>'''Service Provider'''>''' Signing Certificate''' Copy the contents | ||
| + | #Go to the '''Cloudwork Dashboard'''>'''Single Sign On''' | ||
| + | #In the Service list click '''Foldr''' | ||
| + | #Under '''SAML Config''' Click '''Edit''' | ||
| + | #Enable '''Validate Requests''' | ||
| + | #Under '''Certificates''' paste contents of certificate from step 15 into '''Content''' | ||
| + | #Check '''Used for Signing''' | ||
| + | #Click '''Submit''' | ||
| + | |||
| + | [[Category:Single Sign On Services]] | ||
Latest revision as of 06:21, 15 December 2021
Foldr
- Login to Cloudwork Dashboard
- Navigate to Single Sign On>Add New Service>Custom SAML Service
- Fill the form:
- Name: Foldr
- Entity ID: <Provided by Foldr will be in the format of https://<address-of-foldr>/sso/sp>
- Assertion Consumer Service: <Provided by Foldr will be in the format of https://<address-of-foldr>/sso/sp/acs
- Single Logout Service: Leave Blank
- NameID Value: Email
- NameID Format: urn:oasis:names:tc:SAML:1.1:nameid-format:unspecified
- Login URL: Leave blank
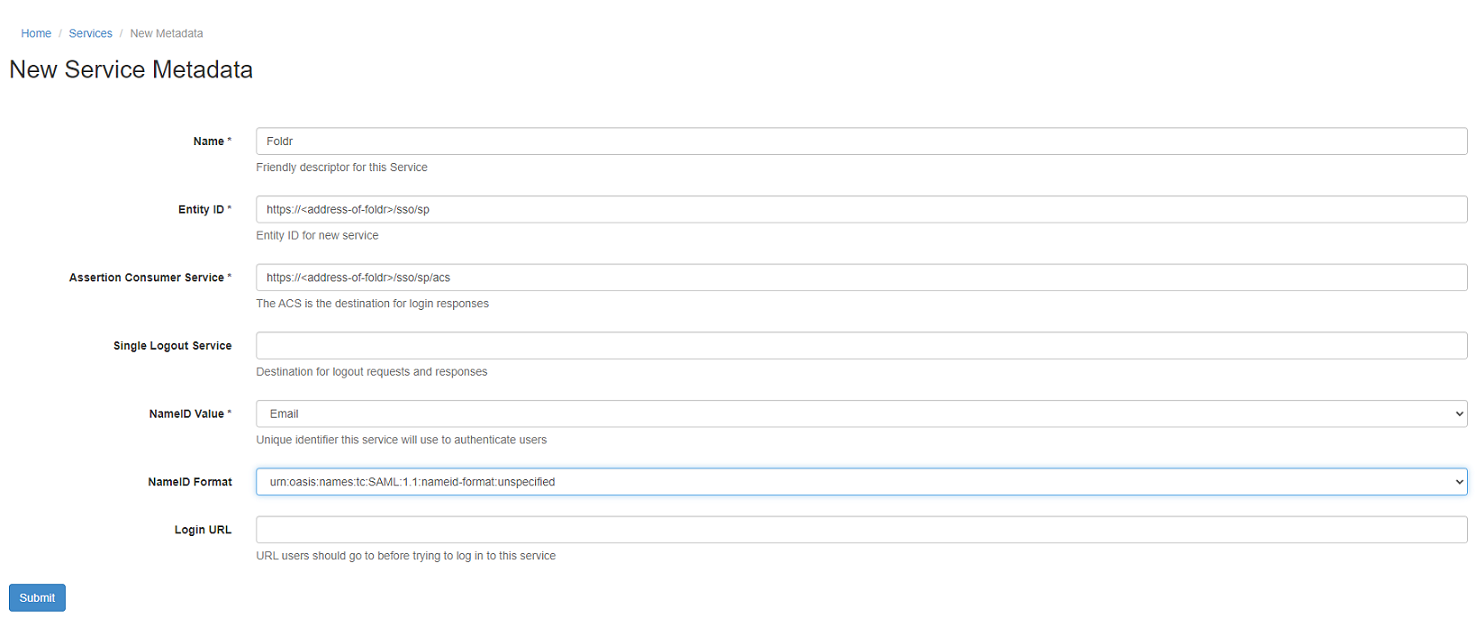 Example of Foldr Configuration
- Click Submit
- Make note of Entity ID and Sign On Endpoint
- Under Certificate click Download
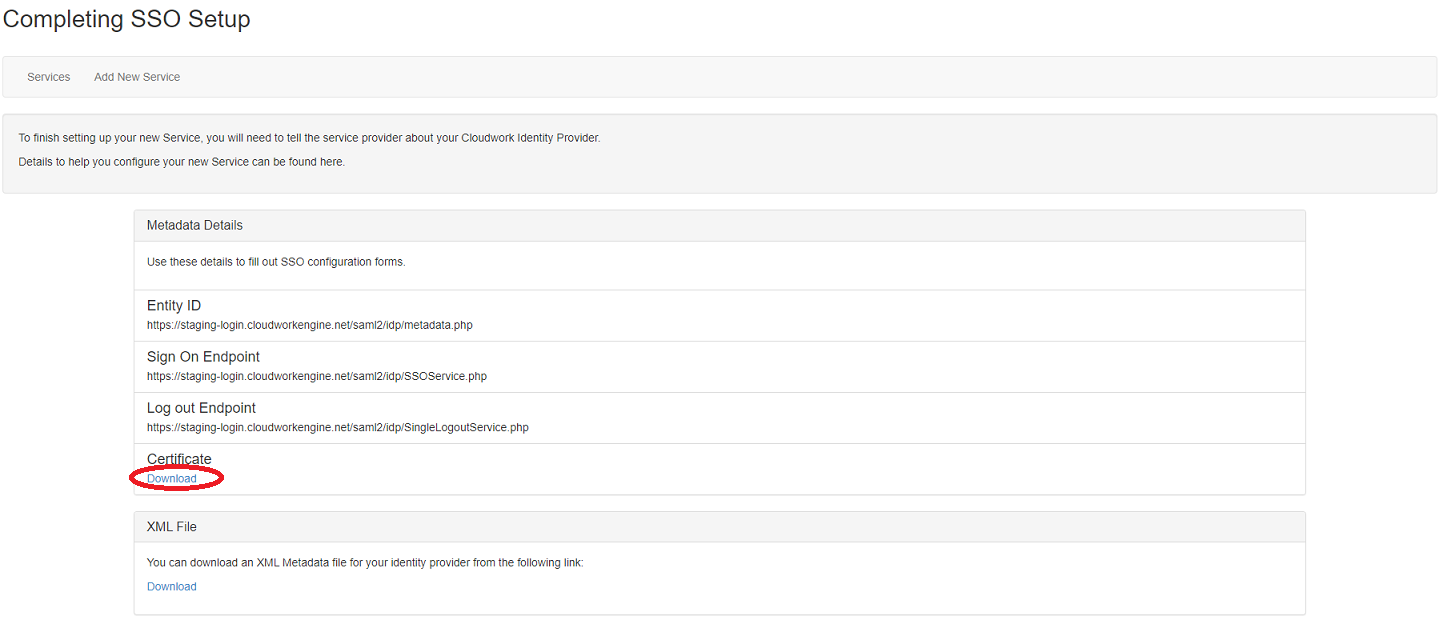 Certificate Download
 - Log in to Foldr settings
- Navigate to Single Sign-On>Service Provider
- Set Enable SSO with external Identity Provider? to On
- The Entity ID and Sign On Endpoint from step 5, paste the value into the following fields
- Issuer: <Entity ID Value from Step 5>
- Sign-In Url: <Sign on Endpoint from Step 5>
- Open the Certificate from Step 6 and copy the content of the certificate.
- In Foldr Settings>Single Sign-On>Service Provider paste the certificate contents from step 11 into Validation Certificate
- Click Regenerate Certificates
- Click 'Save at top of page
- In to Foldr settings>Single Sign-On>Service Provider> Signing Certificate Copy the contents
- Go to the Cloudwork Dashboard>Single Sign On
- In the Service list click Foldr
- Under SAML Config Click Edit
- Enable Validate Requests
- Under Certificates paste contents of certificate from step 15 into Content
- Check Used for Signing
- Click Submit

