|
|
| (13 intermediate revisions by 2 users not shown) |
| Line 1: |
Line 1: |
| − | When setting up Adobe Cloud one of your first tasks is to define and set up an identity system against which your end users will be authenticated. As your organization purchases licenses for Adobe products and services, you will need to provision those licenses to your end users. And for this, you will need a way to authenticate these users. Adobe provides multiple identity types but the main identity type that you can use to authenticate users is Enterprise ID.
| + | These instructions are for Adobe Single Sign On |
| | | | |
| − | ==Federated ID== | + | ===SSO Setup with Adobe=== |
| − | | |
| − | Created and owned by an organization, and linked to the enterprise directory via federation. The organization manages credentials and processes Single Sign-On via a SAML2 Identity Provider (IdP).
| |
| − | | |
| − | The following are a few requirements and scenarios where Federated IDs are recommended:
| |
| − | | |
| − | *If you want to provision users based on your organization's enterprise directory.
| |
| − | *If you want to manage authentication of users.
| |
| − | *If you need to maintain strict control over apps and services available to a user.
| |
| − | *If you want to allow users to use the same email address to sign up for an Adobe ID.
| |
| − | | |
| − | ==Set up==
| |
| − | | |
| − | To use Enterprise IDs start by setting up a directory to which you can link one or more domains.
| |
| | | | |
| | To set up a directory: | | To set up a directory: |
| | | | |
| − | #Create a directory in the Admin Console. | + | #Login to Adobe Admin Console [https://adminconsole.adobe.com/ here] |
| | + | #Navigate to '''Settings'''>'''Create Directory''' |
| | + | #Enter a directory name |
| | + | #Select Federated ID |
| | #Adobe will provision the directory. This usually takes up to 48 hours. | | #Adobe will provision the directory. This usually takes up to 48 hours. |
| − | #If you set up your organization for Enterprise ID identity, you can start linking your email domains to the directory. | + | #After you receive the email from Adobe confirming that your directory is provisioned, configure the SAML settings for the directory. |
| − | #After Adobe has provisioned your directory, configure the SAML settings for the directory.
| |
| | | | |
| − | To create a directory, navigate to the Directories tab in settings, click Create Directory and fill in the necessary information making sure you choose Federated ID. To create a Federated ID Adobe will need to provision this directory before you can proceed with any more operations on it, it will generally take 48 hour and you will be notified by email when it is complete.
| + | ===Verifying Domain with Adobe=== |
| | + | #Contact Adobe support with the following information: |
| | + | #*Email address of your Adobe Sign Account Adminstrator |
| | + | #*The domain that needs to be claimed. Eg. <schoolname>.nsw.edu.au |
| | + | #Wait for a reply from Adobe giving a TXT record. |
| | + | #Publish the TXT record in the domain you wished to claim(This will require you to contact the one in charge of your domain's zone file) |
| | | | |
| − | ===Configure Single Sign On=== | + | ===Configure SAML Settings=== |
| | | | |
| − | After you receive the email from Adobe confirming that your directory is provisioned, configure the SAML settings for the directory.
| + | Adobe will require your school's metadata file. |
| | | | |
| − | When organizations configure and enable Single Sign-On (SSO), users in that organization are able to use their corporate credentials to access Adobe software. This enables users to use a single credential to access Adobe desktop apps, services, and mobile apps.
| + | Navigate to '''Cloudwork Dashboard'''>'''Single Sign On'''>'''Identity Provider'''>'''XML file'''>'''Download'''<br>[[File:Xml_download.PNG|300px|centre|frame|Location of XML File Download]] |
| − | | |
| − | The Adobe Admin Console offers a method for enterprise users to authenticate using their existing corporate identity. Adobe Federated IDs enable integration with a Single Sign-On (SSO) identity management system. Single Sign-On is enabled using SAML, an industry-standard protocol that connects enterprise identity management systems to cloud service providers like Adobe.
| |
| − | | |
| − | SSO can securely exchange authentication information between two parties: the service provider (Adobe) and your Identity Provider (IdP). The service provider sends a request to your IdP, which attempts to authenticate the user. If authentication is successful, the IdP sends a response message to sign in the user.
| |
| − | | |
| − | ====SSO requirements====
| |
| − | | |
| − | To successfully set up SSO for Adobe software, IT Admins need the following:
| |
| − | | |
| − | *An understanding of SAML 2.0
| |
| − | *An Identity Provider (IdP) that supports SAML 2.0, and at a minimum must have:
| |
| − | **IDP Certificate
| |
| − | **IDP Login URL
| |
| − | **IDP Binding: HTTP-POST or HTTP-Redirect
| |
| − | **Assertion consumer service URL
| |
| − | *Access to your DNS configuration for the domain claim process
| |
| − | | |
| − | The login URL of the IdP does not need to be externally accessible for users to be able to access it for logging in. However, if it is only reachable within the organization's internal network, users can only log in to Adobe products when they are connected to the organization's internal network either directly, via wifi or via VPN. It is not necessary for the login page to be accessible only via HTTPS, but it is recommended for security reasons.
| |
| − | | |
| − | If your organization wants to test SSO integration, it is recommended that you claim a test domain that you own, as long as your organization has an Identity Provider with identities set up in that test domain. This allows you to test the integration before you claim the main domains, until you feel comfortable with the domain claim and configuration process.
| |
| − | | |
| − | ===Configure SAML Settings===
| |
| − | | |
| − | You can find this information in the Cloudwork Dashboard under Features > Single Sign On > Identity Provider:
| |
| − |
| |
| − | *IdP Certificate: Download it from your dashboard
| |
| − | *IdP Binding: Redirect
| |
| − | *IdP Issuer: Your Entity ID
| |
| − | *IdP Login URL: Your Sign On Endpoint
| |
| | | | |
| | + | ===SSO setup with Cloudwork=== |
| | When prompted to download the metadata file, you can either email it to us and we will import it for you, or you can follow the instructions below: | | When prompted to download the metadata file, you can either email it to us and we will import it for you, or you can follow the instructions below: |
| | | | |
| Line 84: |
Line 50: |
| | 8. Click '''Submit'''. | | 8. Click '''Submit'''. |
| | | | |
| − | 9. Proceed with configuring Adobe.
| + | |
| | + | |
| | | | |
| | [[Category:Single Sign On Services]] | | [[Category:Single Sign On Services]] |
These instructions are for Adobe Single Sign On
SSO Setup with Adobe
To set up a directory:
- Login to Adobe Admin Console here
- Navigate to Settings>Create Directory
- Enter a directory name
- Select Federated ID
- Adobe will provision the directory. This usually takes up to 48 hours.
- After you receive the email from Adobe confirming that your directory is provisioned, configure the SAML settings for the directory.
Verifying Domain with Adobe
- Contact Adobe support with the following information:
- Email address of your Adobe Sign Account Adminstrator
- The domain that needs to be claimed. Eg. <schoolname>.nsw.edu.au
- Wait for a reply from Adobe giving a TXT record.
- Publish the TXT record in the domain you wished to claim(This will require you to contact the one in charge of your domain's zone file)
Configure SAML Settings
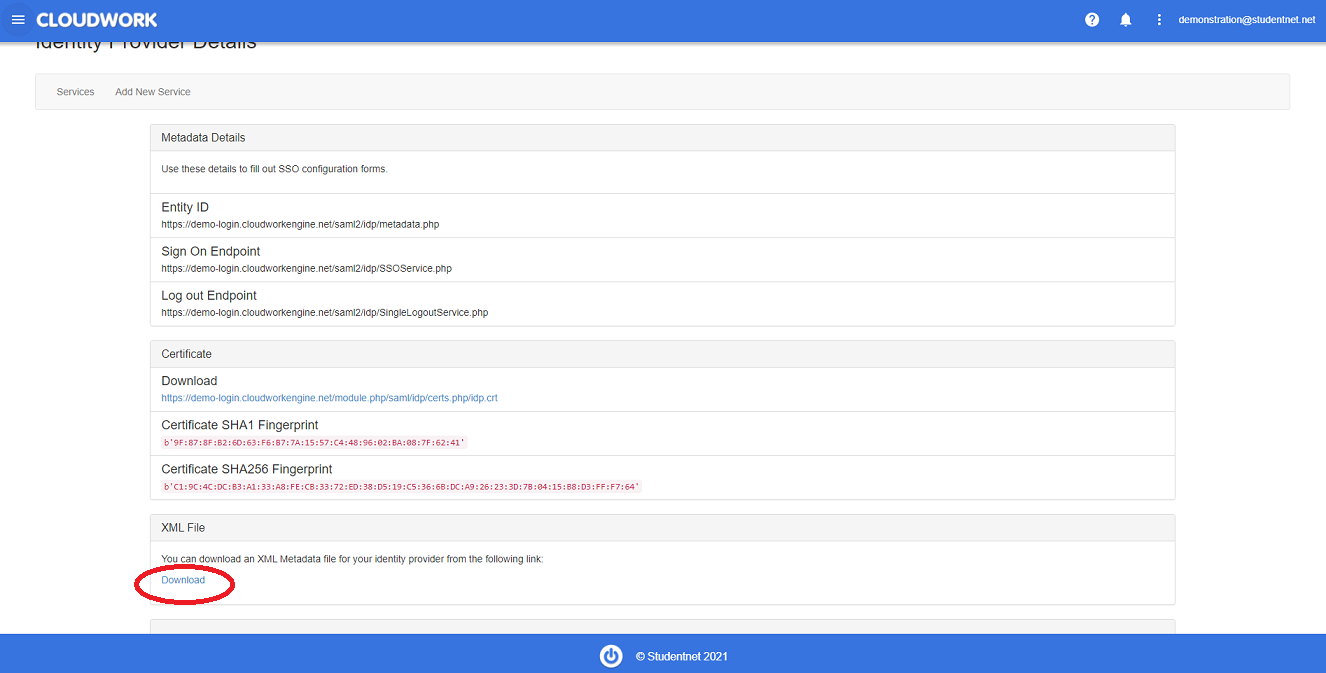
Adobe will require your school's metadata file.
Navigate to Cloudwork Dashboard>Single Sign On>Identity Provider>XML file>Download
Location of XML File Download
SSO setup with Cloudwork
When prompted to download the metadata file, you can either email it to us and we will import it for you, or you can follow the instructions below:
1. Go to your Cloudwork dashboard.
2. Click Add New Service.
3. Click Upload an XML File.
- Give the service a recognisable name (eg, Adobe Enterprise), select the file, and click Submit.
4. Go back to the Services List and select the newly created service.
5. Edit the Attribute Map and update the "Maps to" values as follows:
- First Name: FirstName
- Last Name: LastName
- Email: Email
6. Click Submit.
7. In the SAML Configuration section edit the newly created service and change NameID Value to Email or Username, depending on your chosen identifier (ie. the User login setting which you specified on the Adobe form).
8. Click Submit.
